Easter Time

It’s almost Easter Time and I’m reminded of those early restaurant years when, of course, Lista’s Italian Cuisine would be open for business even on Easter Sunday. For my family, holidays were a mixed bag of religious obligations, pseudo-traditions, traveling to family gatherings, and keeping up with a thriving small business.

At Easter time Dad would inevitably be busy with the restaurant, while we kids would be coloring eggs with Mom; sneaking peeks at our Easter baskets, and looking forward to the big meal with extended family. For our Italian-American family, Easter may have held the closest thing to Italian holiday traditions. As Roman Catholics, church services were an important part of the Easter season (and since I went to Catholic school I attended Mass several times during Easter week). Symbolic foods like roast lamb, asparagus, artichokes, eggs, cheese, and traditional braided Easter breads were usually served. We would often gather with my Dad’s extended family including my Great Grandmother Carmela (Tanzola) Lista — we kids always called her Grandma Lista-Lista.

Carmela Tanzola at 14 years old, and betrothed to a much older Pasquale Lista, emigrated to America around 1905 — she was a beautiful Italian woman who came from a tiny place called Casalicchio (population 20) in the Campania Region of Italy.  Although I never met my Great Grandfather, Grandma Lista-Lista was the anchor of this Italian-American family for many, many years.

In her later years, Grandma Lista-Lista lived with her daughter, my Great Aunt Delores, in Gates NY and we often spent time there on weekends, especially around the Holidays. My favorite thing about visiting Grandma Lista-Lista was her cooking! She had a kind of apartment in the ground floor of Aunt Delores’ house and she had her own kitchen which she used to cook all kinds of traditional Italian foods. I remember trying things like dandelion greens, fried burdock stems (carduni), giant “puffball” mushrooms, salt cod (bacalao), squid (calamari), octopus (polpi) and smelt — along with homemade pizza, pasta, and many types of traditional sweets and cookies. Grandma Lista-Lista’s biscotti (what we called anisette toast) were one of my favorites.

Around Easter and throughout Spring, cooking artichokes and asparagus was very common in Italian-American households. I recall one day while visiting Grandma Lista-Lista she made an interesting dish of artichokes, eggs, and peas. I thought it was delicious and for some reason it is one of the few dishes that brings back memories of childhood and those family visits. 

artichokeseggspeas


Grandma Lista-Lista’s Artichokes, Eggs & Peas

Prep time: 5 minutes
Cook time: 15 minutes
Serves: 2-4 servings

Ingredients:
3 large Eggs
2 TBSP Olive Oil
1-2 cloves Garlic – pressed or minced
1 (14 oz) can Artichoke Hearts – roughly chopped
1 cup Frozen Green Peas – thawed
Salt & Pepper – to taste
Grated Pecorino Romano Cheese – for topping (optional)

Directions:
1. Heat olive oil in a large skillet over med-high heat. Add minced garlic and cook until fragrant (1-2 minutes), add chopped artichokes and peas – stir and cook until artichokes are falling apart and peas are getting tender (7-10 minutes).
2. In a small bowl scramble eggs with 2 tsp water, pour into artichokes and peas and quickly stir to coat and cook the eggs through (3-5 minutes). Season with salt and pepper to taste.
3. Serve with a generous sprinkling of grated Romano cheese if desire.


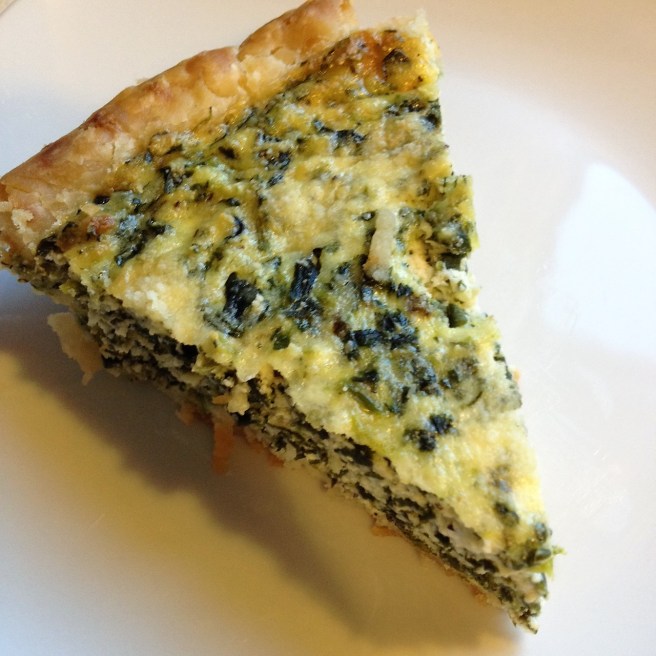
Another Easter memory is eating Spinach & Ricotta Pie.

In northern Italy Torta Pasqualina or Easter Pie is the highlight of the Easter lunch table. Traditionally made with a puff pastry double crust (33 layers representing the age of Jesus Christ), chard or spinach (representing the green of Spring),  and whole hard cooked eggs (representing new life) which are nestled inside the herb and cheese filling.

My take on this dish is much simpler and quick to prepare. I choose to make it with one crust and mix the eggs into the cheese filling. It is similar to a dense quiche and very flavorful.

spinachricottapie


Dan’s Spinach & Ricotta Pie

Prep time: 20 minutes
Cook time: 45-60 minutes
Serves: 6-8 servings

Ingredients: 
1 prepared 9″ Pie Crust (regular or Gluten Free)
3 large Eggs – beaten
1 (16 oz) container Ricotta Cheese
1/2 cup Shredded Mozzarella Cheese
1/4 cup Grated Pecorino Romano Cheese
2 TBSP Fresh Basil Leaves – chopped
2 cloves Garlic – pressed or mince
1/2 tsp Freshly Ground Black Pepper
Salt – to taste
2 TBSP Grated Pecorino Romano for topping (optional)

Directions:
1. Preheat oven to 350 degrees F with rack in the center position.
2. In a large bowl combine the beaten eggs, ricotta, mozzarella, Romano cheese, chopped basil, garlic, and black pepper until smooth.
3. Squeeze as much moisture as possible from the thawed spinach and fold into to the cheese mixture – season with salt to taste.
4. Pour spinach cheese mixture into the prepared pie crust and smooth out the top with a spatula. Sprinkle with additional Romano cheese it desired. Place pie on a rimmed baking tray (cookie sheet) and place in the center of the preheated oven.
5. Bake pie until crust is nicely browned and filling has puffed around the edges and firm in the center about 45-60 minutes (check after 30 minutes and then every 15 minutes until done). Remove from oven and cool slightly on wire rack before cutting.
6. Serve Spinach & Ricotta Pie warm or at room temperature. Refrigerate leftovers for up to 3 days.


There you have it, two Easter Time recipes for you to try… one old time favorite from my Great Grandma Lista-Lista — and one simplified take on an Italian Holiday tradition. Both dishes would make a nice addition to your Easter Brunch or Dinner. You can increase the Artichokes, Eggs, & Peas recipe to serve more people as needed. Spinach & Ricotta Pie can also stand alone with a nice green salad on the side. 

Whether or not you try these recipes, I hope you and your family have a chance to spend some time together during this Easter Time

Until next time remember, “The Sauce Makes the Difference!”

Corned Beef Hash un-Canned

If you grew up in the 60’s and 70’s like I did, you probably remember some of your meals coming from cans. Back then we had some canned “convenience foods” that by today’s standards would be… well… sub-standard. Such wonderful offerings as Dinty Moore Beef Stew, La Choy Beef Chow Mein, Chef Boyardee Ravioli, VanCamp’s Beanee Weenee… and of course Armour Corned Beef Hash.

On nights when Mom wasn’t home or she just didn’t have time to cook, we opened cans. Quite often it was cans of Campbell’s Tomato Soup to go along with our grilled cheese sandwiches (or Chicken Noodle with PB&J), sometimes it was cans of tuna so my big sister could make her famous Tuna Noodle casserole (about the only thing she knew how to make aside from chocolate chip cookies) — but once in a while it was a so-called “complete meal in a can” that we would dutifully eat with our slices of Wonder Bread and Parkay margarine. 

Although I like to reminisce about those childhood canned meals, I certainly don’t miss them — and I probably wouldn’t go out and buy those product for my own pantry (unless of course the Zombie Apocalypse occurs and then all rules are off!)

Of all the canned meals I grew up with, about the only one I still enjoy every so often is Corned Beef Hash. Maybe because my Dad liked the stuff and would make it for us topped with perfectly poached eggs (actually I think what he really liked was the poached eggs, which he would always order when eating breakfast at a restaurant.) So when the notion hits me, and I’m yearning for the old time breakfast staple, I’ll pick up a can; fry it up in  the old skillet, top it with some poached eggs and dine on that perennial favorite. 

Even better though, is when I have the time and ingredients to make my own Corned Beef Hash from scratch. I’ve made it using canned corned beef (not so great) and I’ve purchased deli corned beef (pricey and usually tough) — but the absolute best home made Corned Beef Hash comes the day after St Patrick’s Day when I have freshly made corned beef leftovers (is that an oxymoron?). So below is my take on Corned Beef Hash un-canned and I hope you have an opportunity to make it next time you put that brisket in your slow cooker.


Dan’s Corned Beef Hash un-canned

Prep time: 20 minutes
Cook time: 40 minutes (including potato cook time)
Makes: 4-6 servings

Ingredients:
1 1/2 lbs. Potatoes – peeled, cut, cooked, cooled and chopped
1 lb. Cooked Corned Beef (preferably freshly made) – chopped
2 TBSP Butter
2 TBSP Olive Oil
1 large Yellow Onion – peeled and diced
3 cloves Garlic – minced
1 cup Corned Beef cooking liquid (or beef broth)
1 TBSP Sweet Paprika
Salt and Freshly Ground Black Pepper – to taste
Poached or Fried Eggs for serving (optional)

Directions:
1. Peel potatoes and cut into uniform sized pieces. Place in a large pot, cover with water, add 1 tsp salt and bring to a boil. Cook until just tender but still firm enough to hold shape about 15 minutes. Drain and allow to cool enough to handle. Chop/dice potatoes into small pieces. (Note: you can use leftover boiled potatoes if available.)
2. Meanwhile in a large skillet over medium-high heat, melt butter and oil together, add diced onions and minced garlic – spread evenly and cook until garlic begins to brown and onions are translucent about 3 – 5 minutes. Add chopped corned beef to skillet along with paprika and one cup beef cooking liquid – stir into onions/garlic. Cook until any fat on corned beef begins to melt about 5 more minutes.
3. Add chopped potatoes and stir to combine with beef/onion mixture. Press hash down to cover entire bottom of skillet and allow to cook undisturbed for 10 minutes while liquid cooks off and hash begins to brown on bottom.
4. Using a spatula flip sections of the hash over, season with salt and pepper, press down again and allow to brown for another 5 minutes. Flip sections one more time with spatula – don’t press down and cook for another 5 – 10 minutes until a crust forms on bottom.
5. If serving with eggs, poach or fry eggs during the last 5 – 10 minutes of cooking.
6. To serve lift a portion of hash from skillet and turn over on plate so crusty side is up. Top hash with 1 or 2 cooked eggs (optional) and serve.


There you have it, my take on Corned Beef Hash un-Canned. This tastes so much better than the canned variety and is most likely better for you. Although my Dad was a master at making poached eggs, I find it difficult (maybe because I’m easily distracted and tend to over or under cook them) so I usually serve the hash topped with fried eggs over-easy and a few shakes of red hot sauce on top. I also like a good whole grain toast with mine. You could also try making this hash with 1/2 regular and 1/2 sweet potatoes (just know that sweet potatoes cook faster than regular potatoes, so adjust the cooking time accordingly). We have even made this hash for dinner and paired it with a green salad or steamed broccoli. I hope you give it a try… and let me know how it comes out.

Until next time remember, “The Sauce Makes the Difference!”


Shrimp Alexander (two ways)

Back in the early 90’s I was working for a large contract foodservice company in Rochester, NY. As an account manager, one of the occasional perks was having a dinner meeting at one of the many upscale local restaurants.

On one such occasion, my colleagues and I dined at a small exclusive restaurant located near the Genesee River — I can’t recall the name of the place (and it has been closed for many years) but I still remember one dish I had called “Shrimp Alexander.” 

At that particular restaurant, Shrimp Alexander consisted of sweet and tender colossal shrimp stuffed with salty feta cheese, wrapped in smoky bacon, and served on a bed of garlicky wilted spinach drizzled with lemon. The flavor combination was amazing — and I remember thinking that it was one of the best things I had ever tasted.

shrimpalexander
photo credit Democrat & Chronicle

Once or twice, over the years, I have seen the dish recreated as an appetizer but usually under another name, and never quite hitting the mark of that original dish. Just recently when I looked up Shrimp Alexander online, I found reference to a breaded and pan-fried shrimp appetizer from a popular steakhouse, which doesn’t come close to the dish I remember enjoying all those years ago.

Every once in a while, I make my own version of Shrimp Alexander at home using the following recipe developed from memory. 


Restaurant Style Shrimp Alexander

Prep time: 20 minutes
Cook time: 20 minutes
Serves: 6 appetizers or 3 dinners

Ingredients:
12 Jumbo Raw Shrimp (the bigger the better)

1/2 lb Feta Cheese (use the block – not crumbles)
6 slices Good Quality Bacon
1 lb. Fresh Spinach – cleaned and spun dry
1 cup Chicken Broth
1/2 cup White Wine or Sherry
4 TBSP Butter – divided
2 TBSP Fresh Lemon Juice (about ½ lemon)
2 cloves Garlic – minced (about 1 tsp)
1/4 tsp Paprika
Lemon Wedges – for garnish
Cooking Spray – as needed

Directions:
1. Preheat oven to 350 degrees F. Cover broiler proof pan with foil and spray with cooking spray.

2. Remove shells from shrimp (leave tail if desired) and butterfly.
3. Stuff each shrimp with a generous amount of feta cheese and wrap with 1/2 slice of bacon (secure with toothpick if needed). Arrange on prepared pan and sprinkle with paprika.
4. Bake in preheated oven for 5-7 minutes. Change oven to broil and finish shrimp under broiler until bacon browns slightly and shrimp is white throughout (about 5 minutes more). Remove from oven and keep warm.
5. In a large covered skillet over medium heat, melt butter – add garlic and cook until fragrant. Add chicken broth, wine, and lemon juice – bring to a simmer and allow alcohol to cook off (about 5 minutes). Add spinach, toss and cover for 2-3 minutes or until spinach is wilted. Remove spinach with slotted spoon and keep warm. Add remaining 2 TBSP butter and continue cook/reduce sauce whisking until smooth and shiny (about 5-10 minutes).
6. To serve, place some spinach in the center of each plate – place shrimp with tail end on spinach (2 for appetizer or 4 for dinner). Spoon some of the remaining sauce over shrimp and garnish with lemon wedge.


There you have it, my version of the Shrimp Alexander I enjoyed in a little restaurant somewhere in Rochester, NY in the early 90’s. It’s really good, so I hope you try it. Be sure to splurge on the biggest shrimp you can find since that’s what makes this dish look and taste so impressive.

For those of you that need a more frugal version, why not try this next recipe which is a Shrimp Alexander Dip I created for a recent dinner party with some good friends.

shrimpalexanderdip


Dan’s Shrimp Alexander Dip

Prep time: 30 minutes
Cook Time: 30 minutes
Serves: 10-12 people as a party appetizer

Ingredients:
6 slices Smoked Bacon – diced
16 oz Cream Cheese – softened

6 oz. Feta Cheese – crumbled
1/2 cup Real Mayonnaise (like Hellman’s)
2 TBSP Lemon Juice
1/2 tsp Garlic Powder
1/2 tsp Black Pepper
10 oz. Frozen Chopped Spinach – thawed and squeezed dry
12 oz. Frozen Cooked Salad Shrimp – thawed
1/2 cup Plain Bread Crumbs (optional)
3 TBSP Bacon Fat – melted (optional)
Cooking spray – as needed

Directions:
1. Preheat oven to 350 degrees F.
2. In a skillet over med-high heat, cook and stir diced bacon until almost crispy. Remove with a slotted spoon to a plate, and reserve 3 TBSP rendered bacon fat.
3. In a large mixing bowl blend together cream cheese, feta cheese, mayo, lemon juice, garlic powder, black pepper and chopped spinach. Fold in cooked bacon and cooked shrimp until thoroughly combined.
4. Coat a 9 inch glass pie dish or similar size baking dish with cooking spray. Spoon shrimp mixture into the dish and spread evenly.
5. Bake in the preheated oven for 30 minutes until heated through and bubbling at the sides.
6. OPTIONAL: If desired mix 1/2 cup plain bread crumb with the reserved bacon fat until combined and sprinkle evenly over the surface of the dip before baking.
7. Serve dip warm (or room temperature) with your favorite crackers, chips, veggies or bread.


Now you have two ways to enjoy Shrimp Alexander. The original appetizer/entree is delicious and impressive to serve guests… the appetizer/dip is a great way to share the flavors with a bigger crowd. Either way I’m sure it will be a big hit with your family and friends.

Until next time remember, “The Sauce Makes the Difference!” 

Battle of the Cookie Bars!

I love cookies.. actually I love most any kind of sweets, but I really love cookies! Especially home-made oatmeal raisin, molasses, or chocolate chip cookies. My big sister made chocolate chip cookies all the time when we were kids… and each and every time, she would burn at least one tray full (which was okay because Mom likes burnt cookies).

Sometimes when we wanted something a little different, we would get out Mom’s recipe collection and find the card for making “Hello Dollies.” Even though I never knew where the name came from, Hello Dollies (also called Magic Bars or Seven Layer Bars) were one of my very favorite sweets as a kid, and since we didn’t make them very often they were always a special treat. These decadent cookie bars are chock full of chocolate, coconut, and nuts — plus a salty sweet graham cracker crust and gooey sweetened condensed milk. Yum! I mean, who can go wrong with combining a few pantry staples and coming up with an extraordinary, sinfully delicious dessert. 

Speaking of “sinfully delicious,” there is another cookie bar treat that I have come to love as an adult — I was introduced to this equally decadent dessert several years ago by a very good friend who comes from the Pennsylvania Dutch cooking tradition of “everything is better with more butter and more sugar in it.” My friend calls her recipe “Sin & Temptation” and it consists of a similar group of pantry staples: saltine crackers, butter, brown sugar, chocolate chips, and pecans. Also known simply as Saltine Toffee Bars these things are truly addicting, and so I rarely make them (lest I eat the entire batch and suffer the wrath of my loving wife’s reminders that I’m supposed to lose weight and stay healthy enough to some day retire).

So if you find yourself wondering what to do with that bag of semi-sweet chips, box of crackers, and the few other odds and ends in your baking pantry… you need to try one of these amazingly quick to make, and hard to resist cookie bar desserts — or maybe make both and have your own Battle of the Cookie Bars!


Mom’s Hello Dollies

Prep time: 10 minutes
Bake time: 30 minutes
Makes: 12-15 bars

Ingredients:
1 stick Butter – melted
15 Graham Crackers – made into crumbs (about 1 1/2 cups) 
2 cups (12 oz bag) Semisweet Chocolate Chips
2 cups Sweetened Shredded Coconut
2 cups (about 8 oz) Pecans – chopped
1 (14 oz) can Sweetened Condensed Milk

Directions:
1. Preheat oven to 350°F with oven rack to middle position.

2. Pulse graham crackers  in food processor to make coarse crumbs. Combine melted butter and graham cracker crumbs in a bowl until thoroughly combined. Press evenly into bottom of “9 x 13” baking dish.
3. Top crust with chocolate chips, followed by coconut, and then chopped pecans. Drizzle entire can of condensed milk over layers.
4. Bake until any crust visible is golden brown and pecans begins to toast, about 30 minutes. Remove from oven and let cool completely.
5. To cut easily, refrigerate for about an hour before serving. Cut into 12-15  bars. Bars can be stored at room temperature for 3-5 days, or kept in fridge for 2 weeks.


Sin & Temptation Bars

Prep time: 10 minutes
Cook/Bake time: 15 minutes
Makes: 20-40 pieces

Ingredients:
1 sleeve Saltine Crackers (about 40 crackers)
1 cup Brown Sugar
1 cup Butter
2 cups (12 oz bag) Semisweet Chocolate Chips
1 cup Pecans – chopped
Cooking spray – as needed

Directions:
1. Preheat oven to 375 degrees F. Line a 10 x 15 cookie sheet with foil and spray with cooking spray.
2. Cover cookie sheet with whole saltines (don’t break or crush them) in a single layer — sides touching.
3. In a saucepan over med-high heat, melt the butter and 
sugar together and bring to a boil. Once boiling, reduce heat and simmer for 5 minutes. Remove from heat and immediately (carefully) pour mixture over saltines and spread evenly — taking time to re-position cracker as needed so they lay flat in a single layer.
4. Bake 5 minutes in preheated oven, or until the toffee is bubbling evenly over the whole surface of the crackers. Remove from oven and sprinkle with chocolate chips, let sit for one minute, then gently spread melted chips with spatula (an offset frosting spatula works best). Sprinkle evenly with chopped pecans, and press down lightly.
5. Cut into individual squares immediately — or cool until firm, then break up into serving pieces. Can be stored at room temperature for 3-5 days, kept refrigerated for 2 weeks, or can be frozen in an airtight container for about 2 months.


Well there you have it, two easy to make treats that should satisfy anyone’s sweet tooth — whether you choose Hello Dollies or Sin & Temptation you will be glad you did. Plus they make a great welcome gift or office treat (if you don’t mind sharing). Both store at room temperature in a sealed container — but keeping them in the fridge helps them from sticking together (or being eaten too quickly). 

Until next time remember, “The Sauce Makes the Difference!”