Pasta Primavera

It appears Spring may have  finally arrived in Brockport NY (although there is something curiously akin to snow falling outside my window this morning). Often the seasons or events throughout the year conjure up my special food memories or ideas — and Spring always makes me think of Pasta Primavera.

pastaprimavera

In my early foodservice career, around 1984, I joined a local company that provided contract food services for business, industry, and school feeding programs. And basically for 15 years I managed cafeterias for some of Rochester’s largest employers and a couple of smaller school districts. In that arena I was often called upon to create themed menus and promotional events around the holidays and calendar seasons. Back then it was common to focus on a theme for the weeks leading up to and following the actual special day (much like retail stores featuring Christmas supplies in October). With Spring we would tend to focus on more fresh food, vegetables, lighter meals, and ‘take away’ items as more of customers were getting outside during their lunch breaks. With that in mind I would often feature lighter, more vegetable based meals like Pasta Primavera.

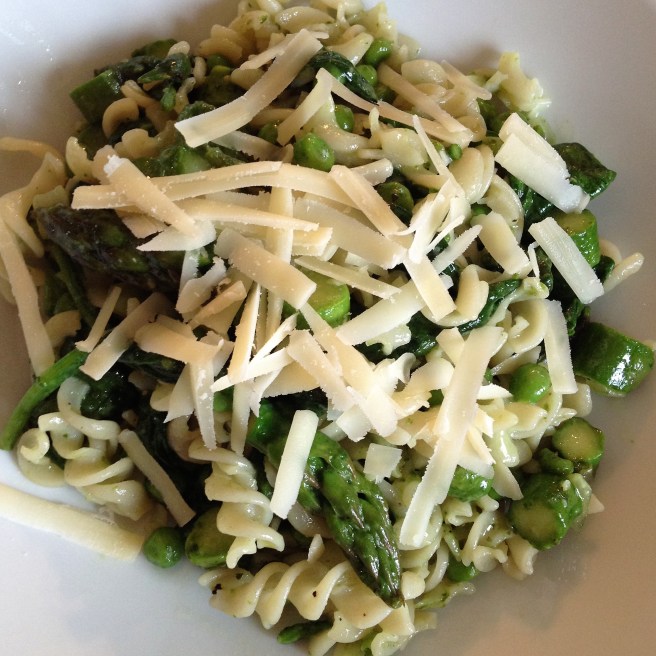
Pasta Primavera (meaning “first spring” in Latin) is a dish that combines early Spring vegetables (often green vegetables)  with pasta and traditionally a cream and butter based sauce (think Alfredo style) but just as often it will be prepared with an olive oil and garlic based sauce such as a basil pesto. It seems that Pasta Primavera came into being in the mid-70’s when a New York city chef and restaurateur prepared the dish for the first time for an Italian aristocrat summering in Nova Scotia. The dish then made its way back to NYC and the famous Le Cirque restaurant where it was hailed in a NY Times article as, “the most talked about dish in Manhattan.” From there Pasta Primavera grew in popularity all over the country and is still enjoyed in its various reincarnations today.

Pasta Primavera was all the rage in the 80’s when I started cooking professionally and so I made it often (although admittedly in many cafeteria setting it was typically a combination of ziti pasta, Alfredo sauce, and frozen vegetable blends). Still when the occasion arose for me to prepare a fresh version I would choose to make the recipe featured here using early Spring vegetables and the lighter olive oil based sauce. As you know, I only use Gluten Free pasta in my house — and I chose to write this as a vegetarian recipe — you could leave out the cheese and keep it vegan if desired. I hope you try this version and enjoy the tastes of Spring.


Dan’s Pasta Primavera 

Prep time: 15 minutes
Cook time: 20 minutes
Serves: 4

Ingredients:
1/2 cup Extra Virgin Olive Oil
2 cloves Garlic – peeled
1 cup packed Fresh Basil Leaves
1/2 cup Freshly Shredded Parmesan Cheese
8 oz Fusilli 
(spiral) Pasta – regular or Gluten Free
2 TBSP Olive Oil
1/2 cup Sweet Onion (like Vidalia) – diced
1 bunch Fresh Asparagus – trimmed of woody ends
1 5-6 oz bag Fresh Baby Spinach
1 cup fresh or frozen (thawed) Green Peas
1 cup Reserved Pasta Cooking Water (or vegetable broth)
Salt and Freshly Ground Pepper – to taste
More Freshly Shredded Parmesan Cheese – for topping

Directions:
1. Put the extra virgin olive oil and garlic in a food processor or blender, and process until garlic is finely chopped, add the basil leaves and Parmesan – pulsing until thoroughly combined and smooth. Season with salt and pepper to taste. Set aside.
2. Cut off the tips of the asparagus and cut the remaining stalks into 1/2 inch pieces — set both aside.
3. Meanwhile, in a pot of salted boiling water, cook the pasta to al dente (about 8 minutes). Remove 1 cup cooking water and set aside. Drain pasta over sink into large colander, briefly rinse with hot tap water, shake off excess and return to pot to keep warm.
4. Heat 2 TBSP olive oil in a large skillet over med-high heat, add the diced onion and cut asparagus stalks — cook for about 3 minutes.
5. Add asparagus tips and peas — cook for another 3 minutes.
6. Add spinach and basil/oil sauce — cook until spinach begins to wilt, about 2 more minutes (add 1/2 cup of reserved pasta cooking water or broth if needed). Turn off heat.
7. Add the cooked pasta and gently toss to coat adding remaining pasta cooking water/broth as needed to keep dish moist.
8. 
Remove from stove, season with salt and pepper to taste, cover and allow to sit for about 5 minutes as pasta absorbs the flavors.
9. Serve immediately topped with additional shredded Parmesan if desired.


There you have it, my version of the famous Pasta Primavera. You can easily substitute other green vegetables such as zucchini, broccoli, or beans — and you can add other vegetables like mushrooms, sweet red peppers, or tomatoes if your prefer that taste. I like the simplicity of fewer vegetables and I think sticking to green vegetables lends itself to the spirit of Spring time. However you decide to make your version, I hope you give it a try soon as Spring is certainly a short-lived season around here.

Until next time remember, “The Sauce Makes the Difference!”

Chicken Veronique

As I’ve mentioned before, after Lista’s Italian Cuisine closed in 1980 I went to work at a national pancake franchise that had opened a restaurant in Brockport. After working there for a couple years I had the opportunity to work at the SUNY College at Brockport (where Dad worked until he retired). As a non-union kitchen employee I was asked to do lots of different things, but one of the jobs I liked the most was when I was asked to prep for banquets. And that brings me to today’s post about Chicken Veronique.

I first learned about Chicken Veronique from my Dad who often made a version of this classic French dish while at SUNY Brockport (apparently it was a favorite of the then college president). Although not a traditional representation of the original dish, Dad’s version of Chicken Veronique combined the familiar technique of chicken piccata (dipping the filet in flour before sauteing in butter and lemon) then adding the more typical Veronique ingredients of shallots, white wine, cream, and seedless grapes.

During my time cooking at the college I was called upon once to make Chicken Veronique for a catered luncheon of about 200 students and faculty. Fortunately for me this was not as daunting a task as it sounds since I had plenty of experience catering alongside my Dad, and the college kitchen was fully equipped for large batch cooking. Therefore, everything was moving along splendidly — I had filleted and pounded the dozens of chicken breasts, sauteed them with shallots and butter, simmered them in white wine and chicken stock, and was ready for the final step of adding cream and… seedless grapes… “where are the grapes?” I asked my manager, a good man, who knew food service and handled people quite well — unfortunately his one failing was inventory control. It turned out he had not ordered fresh grapes for this menu. Not a problem, I was told as he handed me two #10 cans labeled “Jubilee Grapes in Syrup.” Okay. So I opened these enormous cans only to reveal hundreds of shriveled grapes that were dyed a bright Maraschino cherry red.  Still, I was told to use them — so I did. I rinsed them off the best I could and added them as a liberal garnish to top my beautiful pans of chicken, wrapped them up and placed them in the holding oven until serving time. As each pan was sent out to the serving lines, I peeled back the foil to reveal those darned “Jubilee Grapes” had stained my Chicken Veronique with neon pink blotches. Yikes! Luckily for me college students and faculty are not very fussy when it comes to free food.

Since then I will only prepare Chicken Veronique with fresh seedless green grapes so there could be no possibility of repeating of the pink chicken fiasco.


Vinnie Lista’s Chicken Veronique 

Prep time: 30 minutes
Cook time: 30 minutes
Serves: 4

Ingredients:
4 Boneless, Skinless Chicken Breast Halves (about 1 1/4 pounds)

Salt and Ground Black Pepper to taste
1/4 cup All Purpose Flour
2 TBSP Butter
2 TBSP Olive Oil
1 large Shallot (or 1/4 of an onion) – thinly sliced
1 large clove Garlic – minced
1 cup Chicken Stock
1/2 cup Dry White Wine (like Sauvignon Blanc)
1/4 cup Half & Half Cream
2 TBSP Butter
1 TBSP Mild Dijon Mustard (such as Grey Poupon)

1 cup Seedless Green Grapes – halved lengthwise
Chopped Fresh Parsley – as garnish (optional)

Directions:
1. Trim chicken breasts of all visible fat, place one at a time in a gallon size zip-top bag and pound evenly with flat side of a meat mallet to about ¼ inch thickness (if preferred, you can butterfly each breast before pounding). Season both sides with salt and pepper and coat with flour, shake off excess and set on a plate in refrigerator for 10 minutes. 

2. In an extra large skillet, heat 1 TBSP each butter and olive oil over medium-high heat. Add the chicken (in batches) and cook, turning once, until no longer pink inside, 3-4 minutes per side (add additional 1 TBSP butter/olive oil as needed). Transfer the chicken to a platter and cover with foil to keep warm.
3. Add the shallot and garlic to the skillet and cook until fragrant, about 30 seconds. Add the chicken broth and white wine, bring to a boil and reduce liquid to about 1/2 (about 4 to 5 minutes). Reduce heat to med-low, whisk in cream, Dijon mustard and additional 2 TBSP butter – cook for another 5 minutes.
4. Add the grapes, chicken and any accumulated juices to the pan, turning to coat with the sauce. Simmer in sauce for about 5 minutes (or until sauce begins to thicken).
5. To serve, place chicken portion on dinner plate and spoon the grapes and sauce over the top, garnish with a little chopped fresh parsley if desires.


There you have it, my Dad’s version of Chicken Veronique served countless times at SUNY College at Brockport during the 80’s and early 90’s. This is one of those chicken entrees that looks elegant and sophisticated yet is simple and quick to prepare. You can serve it for a dinner party with special guests or as a week day meal for your family. You can even elevate it a little more by adding sauteed fresh mushroom or artichoke hearts with the grapes.

This dish is great served over seasoned rice, quinoa or couscous — it goes very well over angel hair pasta or even buttered noodles. Pair it with some roasted asparagus, Brussels sprouts, haricots verts, or even a simple green salad. Magnifique!

Until next time remember, “The Sauce Makes the Difference!”

Extra Easter Eggs

For all my regular readers who may be wondering why this post-Easter post is coming out so late… well, this year I was able to spend Easter week with my Mom in sunny South Carolina (which happened to be serendipitous, since Rochester NY had cold, snow, and wind all week) and getting back into the groove was a slower process than expected, so as Mom would always say, “better late than never.”


Spending the holiday with Mom reminded me of Easters growing up in Brockport. In our house, it seems we always made more colored Easter eggs than we ever needed. There were five of us little Lista’s and we all had to make at least one egg in every color. I remember that while Mom was hard boiling two or three dozen eggs, we kids would cover the kitchen table with newspapers and get out some coffee cups and tablespoons. We filled each cup with warm water, a tablespoon of white vinegar, and several drops of McCormick food coloring — stirring up red, yellow, blue and green — and then mixing colors to make orange (red and yellow) and lavender (red and blue). Of course, it seems, one of us boys would always try mixing all the colors in hopes of getting black… unfortunately it would only produce a disappointing murky greenish-brown.

Soon after we made a huge mess all over the kitchen table, counters and floor — we were the proud artists that created a giant basketful of pastel colored Easter eggs ready for hiding, hunting, and eventually eating.

In those days, we were a frugal lot and wanted to use up all those eggs before they spoiled, so in the days following Easter Sunday, my Mom would use those extra Easter eggs to whip up a few simple egg dishes. First, there was the familiar Egg & Olive Salad sandwiches (Dad would use sliced pimiento stuffed Spanish olives), next there were the more stylish Devilled Eggs (Mom only used Nance’s Sharp & Creamy mustard  which gave these afternoon snacks a little tangy bite that I really love), and finally it would be the informal Creamed Eggs on Toast, a traditional dish that used to be very popular as a breakfast or brunch item but in my family was served for dinner — not my personal favorite, but my brother Bill loved it!


Dad’s Egg & Olive Salad

Prep time: 10 minutes
Cook time: None if using leftover eggs
Makes: 2-4 sandwiches

Ingredients:
6 leftover Hard Boiled Eggs – peeled & chopped
24 Pimiento Stuffed Spanish Olives – sliced
4 TBSP Real Mayonnaise (like Hellman’s)
Black pepper to taste
Salt to taste (optional)
Toasted Bread for making sandwiches

Directions:
1. In a suitable bowl mix the chopped eggs, sliced olives, mayo and black pepper using a dinner fork — making sure to mash the eggs and olives well. Taste and add a pinch of salt if needed.
2. Spread egg salad on toasted bread (I prefer a good whole grain bread) – cut in half diagonally and serve.


Mom’s Devilled Eggs

Prep time: 10-15 minutes
Cook time: None if using leftover eggs
Makes: 12 devilled eggs

Ingredients:
6 leftover Hard Boiled Eggs – peeled & cut in half lengthwise
2 TBSP Real Mayonnaise (like Hellman’s)
2 tsp Sharp & Creamy Mustard (like Nance’s or similar type)
Paprika for garnishing

Directions:
1. Carefully remove the yolks from the egg halves. Set whites on a serving plate and put yolks in a small bowl.
2. Using a fork, mash the egg yolks and add mayo and Nance’s mustard – continue to mash with fork until a smooth paste forms (add a little more mayo if too thick).
3. Using a teaspoon fill the egg whites with the yolk filling and sprinkle with a little paprika as a garnish. Serve.


Mom’s Creamed Eggs on Toast

Prep time: 15 minutes
Cook time: 20 minutes
Serves: 

Ingredients:
6 leftover Hard Boiled Eggs – peeled & sliced into 1/2″ rounds
4 TBSP Butter
4 TBSP All Purpose Flour
2 cups Whole Milk
1/2 tsp Salt
1/4 tsp White Pepper
Sliced Bread for toasting
Butter for toast (optional)
Paprika or Cayenne Pepper for garnish (optional)

Directions:
1. In a medium saucepan, melt butter over medium-high heat. Whisk in flour until smooth. Continue to cook and stir until bubbly.
2. Whisk in milk, a little at a time, until it’s all incorporated. Season with salt and white pepper.
3. Continue to cook and whisk until sauce is thick and creamy.
4. Remove from heat and add sliced eggs, stir to coat.
5. Toast bread slices and butter if desired. Cut toast diagonally.
6. To serve, lay 2-4 toast triangles on individual plates and spoon creamed eggs over toast. Garnish with a sprinkle of paprika or cayenne pepper if desired.


There you have it, three simple ways the Lista family would use up those Extra Easter Eggs. Maybe not haute cuisine, but certainly worthy of a humble blog post. I hope you try at least one when you find you have a few hard boiled eggs in your fridge. 

Until next time remember, “The Sauce Makes the Difference!”