Antipasto

antipasto

Anyone that grew up in or around the Italian-American community surely encountered antipasto. Antipasto is traditionally the first course in an Italian meal. Antipasto most often consists of cured meats, cheeses, olives, pepperoncini (hot peppers), anchovies, mushrooms and pickled vegetables — served individually or combined into small plates or large family style platters. Antipasto can range from the simple and rustic to the extravagant.

In my family antipasto was reserved for Holidays and large gatherings. There were two ways antipasto was served…. first there was the elaborate salad presented on a large platter with a bed of greens topped with layer upon layer of salami, capicola, prosciutto, provolone, mozzarella, pepperoncini, olives, mushrooms, tomatoes, artichokes, eggplant, and giardiniera. (This, of course, might vary depending on what was available or the mood and budget of the preparer.) 

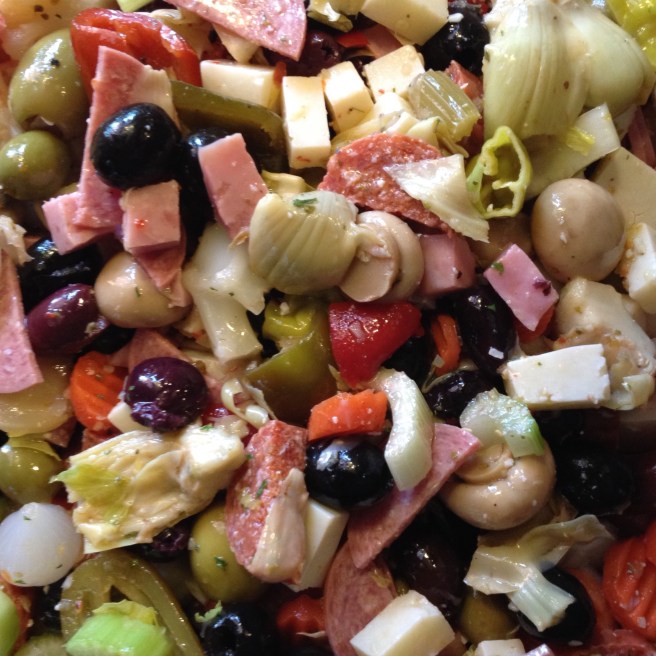
The other way antipasto was served was generally called “olive salad” and it was a combination of olives, pepperoncini, celery and onions, with chunks of provolone, salami or pepperoni. This salad was dressed with olive oil, red wine vinegar, oregano, and crushed red pepper. It was best served after a day or two of marinating… and this was one of my Dad’s favorites (and one of mine too).

At Lista’s Italian Cuisine we served a variation of the former, but rarely the latter (unless it was for a catered event). The restaurant menu featured an Antipasto Platter that was big enough to share. The original recipe card calls for a large dinner plate lined with chopped lettuce, topped with chick peas, ripe olives, pepperoncini, tomato wedges, onions, sliced beets, and eggplant then drizzled with our house made Italian dressing — this was topped with slices of pepperoni, salami, ham, mozzarella and provolone, and then it was garnished with a sprinkle of Pecorino Romano and an anchovy fillet. It was a real work of art when presented to the customer.

For this post I’m featuring the second type of antipasto or “olive salad” simply because I have recently been making this salad for my father-in-law who loves it even more than my Dad did. When I found out that my father-in-law was going to the grocery store weekly and paying about $9.00 a pound for olive salad, I decided to make it for him instead. Of course, when all is said and done I might have invested about that much myself — but the result was far superior and much more authentic to my family roots.

This recipe make a large quantity of antipasto since it calls for several components that come in 12 or 16 oz. jars (the easiest and most cost effective way to buy them). There are some fresh elements, and a couple of more expensive items — you can choose what you want to add to your version based on your own particular taste. My father-in-law and I like our antipasto on the hot and spicy side, but that can be dialed down by using little or no hot peppers.

So if you’re feeling adventurous and want to make a batch of antipasto salad for a family gathering or large dinner party try this recipe and my combination of ingredients…I think it has great flavor and balance and looks really nice presented on the table.


Dan’s Antipasto

Prep time:  30 minutes
Cook time:  15 minutes
Marinate time:  4 to 24 hours
Makes: about 12 cups

Ingredients:
2 stalks Celery – cut into 1 inch pieces
1 Yellow Onion – peeled and cut into 1 inch pieces
2 Carrots – peeled and sliced 1/2 inch thick
3-4 cloves Garlic – peeled
1/2 cup White Vinegar
1 tsp Salt
pinch Crushed Red Pepper
1 jar Pitted Kalamata Olives – drained

1 jar Pimento Stuffed Green Olives – drained
1 can Pitted Ripe Olives (California type) – drained
1 jar Pepperoncini – drained, stems removed and halved
1 jar Giardiniera Pickled Vegetables (hot or mild) – drained
1 jar Button Mushrooms – drained
1 can Quartered Artichoke Hearts – drained
1 jar Whole Roasted Red Peppers – drained and cut into 1 inch pieces
1/2 lb. Pepperoni Stick – cut into 1/2 inch half circles
1/2 lb. Hard Salami or Soppressata – cut into 1/2 inch dice
1/2 lb. Ham or Capicola or Prosciutto – cut into 1/2 inch dice
1/2 lb. Sharp Provolone (or Asiago) – cut  into 1/2 inch dice
1/2 lb. Mozzarella – cut into 1/2 inch dice
1/2 cup Olive Oil
1/4 cup Red Wine Vinegar
1 tsp Dry Oregano
1/2 tsp Crushed Red Pepper (optional)

Directions:
1. In a medium covered sauce pan combine the cut celery, onion, carrots and garlic cloves with white vinegar, salt, pinch red pepper and enough water to just cover vegetables. Bring to a boil and cook for 5 minutes. Remove from heat, cover and allow to stand in the hot liquid for another 10 minutes. Drain and rinse under cold water. Set aside.
2. In a large mixing bowl combine the next 8 ingredients (the jarred olives, etc.) that have been drained. Add the cooked celery mixture and toss to combine.
3. Add the diced meats and cheeses to the vegetables and toss to combine. In a small bowl whisk together olive oil, red wine vinegar, oregano and red pepper. Pour dressing over the antipasto salad and toss to coat. Cover an refrigerate for at least 4 hours up to overnight. Stirring occasionally if possible.
4. Before serving remove from refrigerator, stir to distribute dressing, spoon antipasto into a shallow serving dish and serve with tongs or a slotted serving spoon. Leftover antipasto can be kept in refrigerator in a tightly sealed container for up to one week.


There you have it, my version of Antipasto — a beautiful combination of colors, flavors and textures with a spicy kick and an authentic taste. This recipe makes a lot of antipasto but it keeps in the fridge for a 7-10 days. It’s a great item to share with others. I hope you find a reason to make this salad for your family and maybe it will become one of their favorites too.

Until next time remember, “The Sauce Makes the Difference!”

Zucchini “Lasagna”

So, as I may have mentioned before, I’m not much of a gardener. I have a tiny plot behind my house that we plant tomatoes, peppers, and zucchini each year hoping we’ll get a harvest. The problem is that no one in my house (including me) wants to do the work of taking care of the garden — so it gets weedy, overgrown, and just plain unruly.

Dan'sGarden2018
Dan’s Garden September 2018

The thing is that every year we dutifully weed the bed, hand-till it, compost it, plant it, water it… and forget-about-it! Still every year we seem to get at least some produce from the untended mess of plants — so every year we vow to do better at tending and cultivating our micro-farm. This year we planted late (again) and dealt with the early summer drought (and the lack of human attention) to gain several dozen really beautiful tomatoes, zero peppers, and about eight overgrown zucchini… I mean the giant, monster squash that comes from checking the garden only once every two weeks.

With all that being said, I still like to find a way of using these overgrown summer staples.

Which brings me to today’s post Zucchini “Lasagna.” This past week I’ve had four giant zucchini taking up room on my kitchen counter and I needed to do something with them. So I tried to pass them on… but most people I know around here have their own zucchini to bestow on others, so it was up to me.

I wanted to make something with sauce and cheese, so I decided to make a “lasagna” with my zucchini. I like the idea of baking the zucchini with ricotta and mozzarella layers to hold it together — my family voted for a ground beef layer, so I made the zucchini “lasagna” in the same fashion as traditional lasagna at Lista’s Italian Cuisine (see my post Lasagna Bolognese? from July 27, 2017). After slicing the zucchini, I layered it with sauce, ricotta cheese, meat sauce, and lots of mozzarella and Romano cheeses. Then baked it for about 90 minutes — let it set for another 30 minutes and topped it with a little more sauce and a sprinkle of grated Romano. Delizioso!

Please Note: my zucchini lasagna was a bit of a fail for me. It came out very watery after it was baked (you can see it in the last photo above). The problem was I didn’t slice the zucchini thin enough and I didn’t take time to prep the zucchini “noodles” with salt or heat to dry them out. After I let it rest for 30 minutes before serving, the moisture accumulated in the pan and I was able to lift out a slice and then carefully drain much of the water out of the pan (I did this 2-3 times while serving) so the servings held up nicely and the extra moisture was minimized. And overall it was very tasty and my family enjoyed it.

So after the fact I did a little reading and found some tips to avoid the moisture problem: 1. Slice your zucchini very thin (use a mandolin slicer) perhaps lengthwise… and layer the sliced zucchini on a double thickness of paper towels and lightly salt it (salt draws out moisture) and let it sit for several minutes. Then pat the slices dry with more paper towels before assembling the lasagna.
2. Another method is to bake the thinly sliced zucchini (with or without salting it) in the oven to dry it out before making the lasagna.
3. I read one recipe where the author added some dry quinoa to the bottom of the pan which will absorb some of the moisture. This method is appealing to me since I prefer not to use salt.

If, like me, you typically cook by experimentation then give one of the methods a try… or maybe you’ll discover your own way of avoiding the excess moisture.


Dan’s Zucchini “Lasagna”

Prep time: 40 minutes
Cook time: 60-90 minutes
Rest time: 30 minutes

Serves: 8-12

Ingredients:
2 extra large or 4 small Zucchini – sliced thin
1 lb. Ground Beef
1/2 med Onion – finely chopped
1/2 cup Seasoned Bread Crumbs (optional)
16 oz. Ricotta Cheese
2 Eggs
1 TBSP Dry Parsley Flakes
1 cup Grated Romano Cheese – divided
2 cups Shredded Mozzarella Cheese
4-6 cups Prepared Pasta Sauce – divided
Salt and Black Pepper – to taste

Directions:
1. Preheat the oven to 350 F with the rack in the center. Coat a 9×13 baking pan with cooking spray (like Pam).
2. Slice the zucchini very thin and remove some of the moisture using one of the methods mentioned above — or wing it like I did.
3. In a skillet, brown the ground beef and chopped onion over med-high heat until no longer pink. Drain and return to pan. Season with salt and pepper to taste, and add bread crumbs and 2 cups prepared sauce and stir to combine. Set aside.
4. In a medium bowl scramble the eggs, dry parsley, and 1/2 cup Romano together, stir in the ricotta cheese until thoroughly combined. Season with black pepper and set aside.
5. Layer the “lasagna” in the baking pan as follows: Spread one cup prepared sauce in the bottom of the baking pan. Layer sliced zucchini overlapping as needed to cover the bottom of pan. Spread the meat sauce mixture evenly over the zucchini, and sprinkle evenly with about 2/3 cup mozzarella. Add another layer of zucchini. Spread the ricotta cheese mixture evenly over top, and sprinkle another 2/3 cup mozzarella over the ricotta. Top with another layer of zucchini, spread the last cup prepared sauce over that and sprinkle the last 2/3 cup mozzarella over that. With your hand, press down the “lasagna” layers to make sure there are no air gaps.
6. Bake the “lasagna” uncovered in heated oven for 60-90 minutes until hot and bubbly and center reaches 180 F with a thermometer. Cover loosely with foil during last half of cooking if top gets too brown.
7. Remove from oven and allow to rest about 30 minutes before serving.
8. Cut “lasagna” portions with a sharp knife and lift out with a spatula. Top with additional pasta sauce and grated Romano cheese if desired.


There you have it, my Zucchini “Lasagna” — a great way to use up those giant zucchinis in your garden (or the ones your friend tries to pawn off on you). This recipe would work just as well with yellow summer squash, eggplant, or a combination.

Until next time remember, “The Sauce Makes the Difference!”

Salmon Patties with Quick Remoulade

salmonpatties

Like many people, my family has enjoyed salmon as a regular part of our dinner menu for quite some time. Salmon has grown in popularity over the years due to its availability, sustainability, and nutritional value. A great tasting source of high quality protein and loaded with Omega-3 fatty acids, salmon is one of the best choices when seeking a fish protein for your plate.

Now that my household is down to just two of us, we occasionally have some leftover cooked salmon in the refrigerator. When this happens I try to find an alternative way to serve the seconds. (It should be noted that leftover cooked fish should be eaten within 3 days.) One way I use up leftover salmon is to serve it cold over a tossed green salad with a nice lemon based vinaigrette. Sometimes I use the leftover salmon in a creamy fish chowder or add it to a coconut milk curry.

But recently I had some leftover grilled salmon in the fridge and decided to take a walk down memory lane and mixed up some delicious Salmon Patties just like my Dad, Vinnie Lista, did when I was a kid.

I can’t recall ever seeing grilled salmon on the menu at Lista’s Italian Cuisine… but I definitely remember my Dad making these Salmon Patties at home using canned salmon. In those days there were some lean times and canned salmon was a frugal way to feed our family of seven. Still we didn’t think of it as a cheap meal… to us Salmon Patties were a treat (of course anything fried was a treat for us kids). And all the more fun when the patties were topped with American cheese and served on a hamburg bun!

I pan fried my Salmon Patties and served them with a quick Remoulade sauce. The result was moist, crispy, light tasting Salmon Patties that paired perfectly with the tangy, sharp Remoulade Sauce on the side. Although I used leftover fresh salmon that I had grilled; these Salmon Patties can be made “old school” with canned salmon, but I suggest you splurge for the boneless-skinless variety — or be sure to carefully remove the skin and bones before making this recipe.


Dan’s Salmon Patties

Prep time:  15 minutes
Cook time:  15 minutes
Makes:  6-8 patties

Ingredients:
14 oz Cooked Salmon (leftover or canned)
1/2 cup Vidalia Onion – minced
1/2 cup Dry Bread Crumbs (regular, panko or Gluten Free)
1 Egg – beaten
2 TBSP Mayonnaise
1 TBSP Chopped Parsley
1/8 tsp Cayenne Pepper (optional)
Salt & Black Pepper – to taste
1/4 cup Canola Oil – more as needed

Directions:
1. Remove skin from the cooked salmon and crumble fish into a large mixing bowl (if using canned salmon pick out the skin and bones).
2. Add the minced onion, bread crumbs, eggs, mayonnaise, parsley and cayenne to the salmon and gently mix until fully combined. Season with salt and pepper if desired (this may depend on what seasoning was already on the salmon).
3. Using about 1/2 cup of salmon mixture, form into patties about 3 inches wide x 3/4 inch high. Set patties on a plate and refrigerate until ready to pan fry.
4. Heat skillet on med-high, add 1/4 cup oil and swirl to coat pan. When the oil is shimmering, carefully place salmon patties in hot oil about 1 inch apart (do not crowd pan – cook in batches if needed) and cook undisturbed about 4-5 minutes until deep brown crust forms.
5. Using a spatula/turner gently flip the patties and cook undisturbed on the other side for another 4-5 minutes.
6. Remove cooked patties from pan and place on a paper towel lined plate until ready to serve (keep warm if cooking another batch). Serve with Quick Remoulade Sauce on side.


If you are not familiar with Remoulade Sauce, it is a mayonnaise based sauce similar to the more well-known “tartar sauce” but with elevated ingredients and a distinct sharpness that goes really well with fish and seafood. Most recipes call for a crunchy element such as chopped celery, capers, or cornichons (pickles). For this “quick” version I just used what I had on hand – so I chose to minced up a dill pickle. A grainy mustard is best in this recipe, but any sharp flavor mustard will work such as creole, spicy brown or Dijon. Some people say adding horseradish is a must, but I didn’t use it for this recipe.


Dan’s Quick Remoulade

Prep time:  5 minutes
Makes:  about 1 cup

Ingredients:
1 cup Heavy Mayonnaise (such as Hellman’s)
2 TBSP finely chopped Dill Pickle
2 TBSP Ketchup
1 TBSP Grainy Style Mustard (or other sharp mustard)
1 TBSP Worcestershire Sauce
1 tsp Lemon Juice
1 dash Hot Pepper Sauce (like Tabasco)

Directions:
1. Combine all ingredients in a small bowl and refrigerate until ready to serve.


There you have it, Salmon Patties with Quick Remoulade sauce. A great way to use up leftover cooked Salmon. This recipe also makes a great appetizer if you form small patties (about the size of a silver dollar). I hope you enjoy this economical and delicious “old school” way to cook Salmon.

Until next time remember, “The Sauce Makes the Difference!”