
I don’t often make roast beef for my family since we’re not big red meat eaters. Although, admittedly, we all enjoy a good steak on the grill or an occasional chuck roast in the crock pot. The exception tends to be around the Christmas holiday when the Thanksgiving turkey is still a close memory and ham or lamb wants to be reserved for the Easter table. Christmas just calls for a beautiful roast beef. At times we splurge on a impressive Prime Rib or succulent Tenderloin, but this year we chose a humble Eye of Round for the main event. Roasting beef can be troubling since you want to turn out a tender, juicy and flavorful roast — and oven roasting can dry out the very lean eye of roast. I decided to go with the tried and true “high-temp method” to cook my roast.

Here’s what I did:
1. I prepared my 6 pound roast the night before by removing the store packaging and patting off all moisture (blood) with paper toweling. Then placed the roast, fat side up, in a roasting pan – covered it with parchment paper (tucked in around the roast) and placed it back in fridge overnight.
2. Two (2) hours before it was time to cook (11:00 am for me), I took the roast out of the fridge to bring the meat to room temperature (this provides a more even cook throughout).
3. After 1 1/2 hours (12:30 pm), I preheated my oven to 500 degree F. [Note: this method requires a modern oven with a digital setting and a tight door seal.] I uncovered the roast and brushed it with olive oil, then seasoned with kosher salt, fresh ground black pepper, freshly minced garlic (4 cloves) and a sprinkle of dry rosemary.
4. When ready (1:00 pm) I placed the seasoned roast in the preheated oven and roasted it at 500 F for 36 minutes (6 minutes per pound). Leaving the door closed, I turn the oven to 350 F for another 30 minutes (this was approx. 2:00 pm), then shut the oven off and left the roast in for 2 hours (DO NOT OPEN THE DOOR). You can insert a meat thermometer or temperature probe in the roast so you can monitor the cook — or just do it on ‘blind faith’ like me and hope for the best.
5. After the 2 hours (4:00 pm), I removed the roast from the oven, tented tightly with foil, and let it rest for 30-40 minutes while I finished the rest of the meal.
6. When everyone sat down to eat we had a beautiful roast, perfectly pink (med-rare) throughout, juicy and tender with a nice brown crust on the outside and a deep beefy flavor. Delicious!
This high-temp method of roasting reminds me of the days I worked in banquets and catering during the late 80’s and 90’s. I roasted lots of beef back then, everything from enormous steamship rounds, standing rib roasts, and whole rib-eyes — to commercial top rounds, briskets, and tri-tips. One of the ways we ensured that the beef didn’t get over done (most people want some pink in their beef) was to slow cook the roasts. We often started in a very hot oven to “burn the fat cap” and give the roast a nice caramelized outside (which created the best au jus and gravy) and then finished the cooking at 200 degrees F. At a couple places I worked we would roast up to 30 whole rib-eyes at one time in Alto-Shaam holding ovens (a kind of big metal box with heating elements and shelving) at 190 degrees F all day and they still came out beautifully pink and tender.
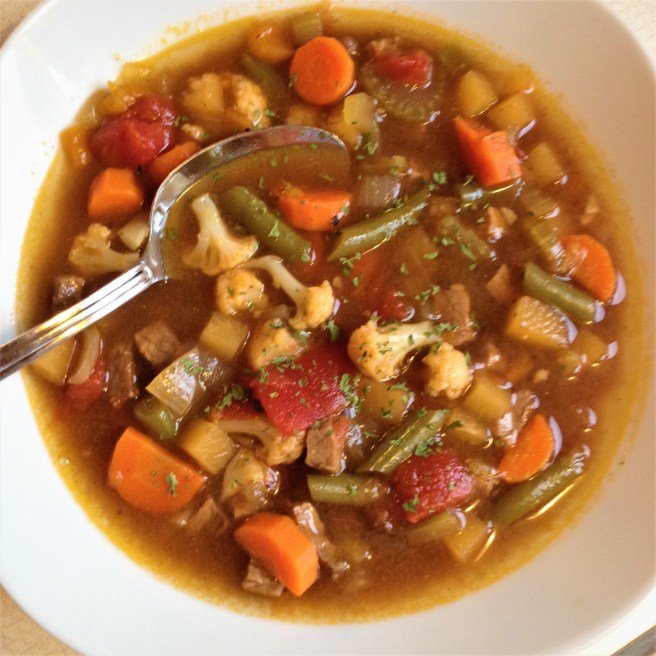
Roast beef also reminds me of my early food service days when leftovers were never thrown out but were always… and I mean always… used up in the daily soup selections. So that’s why I titled this post Leftover Roast Beef & Vegetable Soup because I made a nice soup from the tail end of the roast and wonderful au jus that was left after Christmas dinner.
As I’ve mentioned before, my Dad, Vinnie Lista was known for his soups, bisques, and chowders at Lista’s Restaurant. One of his personal favorites was beef barley soup but it was only made when there was leftover roast beef on hand (which thankfully was often). There was more of a “formula” than a recipe when making soups at Lista’s which gave license to improvise ingredients if something was in surplus or short supply. With that in mind we most always started broth based soups with mirepoix (carrot, onion, celery) and a good strong stock. After that it was up to Dad’s culinary whims to produce the final product.
In that same vein, I made a delicious Beef & Vegetable Soup based on some surplus, some basics, and whatever else I had on hand. Like all homemade soup recipes the skies the limit when it comes to adjusting to personal tastes. So start with the basic “formula” and feel free to add or subtract ingredients as it meets your pantry or family’s needs.
Leftover Roast Beef & Vegetable Soup
Prep time: 30 minutes
Cook time: 40 minutes
Serves: 8-12 servings
Ingredients:
1 TBSP Olive Oil or Beef Fat from leftover roast
1 lb. Leftover Roast Beef – cut into 1/2 inch cubes
1/2 medium Rutabaga – peeled and cut in 1/2 inch pieces (about 1 cup)
1 med Yellow Onion – peeled and 1/2 inch dice
3 ribs Celery – sliced crosswise in 1/2 inch pieces
3 cloves Fresh Garlic – chopped
4 med Carrots – peeled, cut lengthwise and sliced in 1/2 inch pieces
2 qts. Beef Broth/Stock – good quality homemade or store bought
1 (15.5 oz) can Diced Tomatoes with juice
1/2 cup Pearl Barley (optional)
1-2 Bay Leaves
1 cup Frozen Cut Green Beans
1 1/2 cups Cauliflower Florets (small)
Salt & Pepper – to taste
Directions:
1. Prepare the beef and vegetables before starting soup.
2. In a 6 quart covered pot or dutch oven, heat oil or fat over med-high heat. Add diced leftover roast beef, diced rutabaga, diced onion, sliced celery, and chopped garlic. Cook and stir until garlic is fragrant and vegetables begin to soften – about 10 minutes.
3. Add carrots, beef broth, diced tomatoes with juice, pearl barley (if using) and bay leaf. Bring to a low boil, reduce heat to low, cover and simmer for 20 minutes until vegetables are tender.
4. Add frozen green beans and cauliflower, increase heat to medium and bring back to a simmer. Cook for 10 minutes until barley and cauliflower are tender. Turn off heat – season with salt and pepper to taste – and remove bay leaf.
5. Serve soup ladled in bowls with a hearty multi grain bread on the side.
Notes: Potatoes can be substituted for the Rutabaga (if you’re not a fan)… just add them later with the green beans and cauliflower. Barley is optional (we are Gluten Free and can’t eat it) but it does add a nice texture to the soup and enhances the broth. Feel free to add or substitute vegetables to suit your taste.
There you have it, a nice home-style Leftover Beef & Vegetable Soup for a cold winter evening meal. I hope you enjoy this recipe — and I hope you think twice before tossing out those leftovers.
Until next time remember, “The Sauce Makes the Difference!”
