Salmon Patties with Quick Remoulade

salmonpatties

Like many people, my family has enjoyed salmon as a regular part of our dinner menu for quite some time. Salmon has grown in popularity over the years due to its availability, sustainability, and nutritional value. A great tasting source of high quality protein and loaded with Omega-3 fatty acids, salmon is one of the best choices when seeking a fish protein for your plate.

Now that my household is down to just two of us, we occasionally have some leftover cooked salmon in the refrigerator. When this happens I try to find an alternative way to serve the seconds. (It should be noted that leftover cooked fish should be eaten within 3 days.) One way I use up leftover salmon is to serve it cold over a tossed green salad with a nice lemon based vinaigrette. Sometimes I use the leftover salmon in a creamy fish chowder or add it to a coconut milk curry.

But recently I had some leftover grilled salmon in the fridge and decided to take a walk down memory lane and mixed up some delicious Salmon Patties just like my Dad, Vinnie Lista, did when I was a kid.

I can’t recall ever seeing grilled salmon on the menu at Lista’s Italian Cuisine… but I definitely remember my Dad making these Salmon Patties at home using canned salmon. In those days there were some lean times and canned salmon was a frugal way to feed our family of seven. Still we didn’t think of it as a cheap meal… to us Salmon Patties were a treat (of course anything fried was a treat for us kids). And all the more fun when the patties were topped with American cheese and served on a hamburg bun!

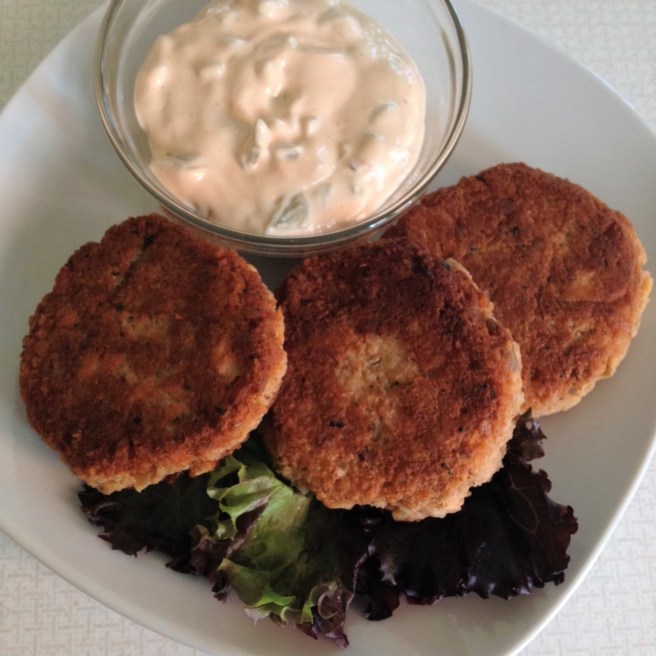
I pan fried my Salmon Patties and served them with a quick Remoulade sauce. The result was moist, crispy, light tasting Salmon Patties that paired perfectly with the tangy, sharp Remoulade Sauce on the side. Although I used leftover fresh salmon that I had grilled; these Salmon Patties can be made “old school” with canned salmon, but I suggest you splurge for the boneless-skinless variety — or be sure to carefully remove the skin and bones before making this recipe.


Dan’s Salmon Patties

Prep time:  15 minutes
Cook time:  15 minutes
Makes:  6-8 patties

Ingredients:
14 oz Cooked Salmon (leftover or canned)
1/2 cup Vidalia Onion – minced
1/2 cup Dry Bread Crumbs (regular, panko or Gluten Free)
1 Egg – beaten
2 TBSP Mayonnaise
1 TBSP Chopped Parsley
1/8 tsp Cayenne Pepper (optional)
Salt & Black Pepper – to taste
1/4 cup Canola Oil – more as needed

Directions:
1. Remove skin from the cooked salmon and crumble fish into a large mixing bowl (if using canned salmon pick out the skin and bones).
2. Add the minced onion, bread crumbs, eggs, mayonnaise, parsley and cayenne to the salmon and gently mix until fully combined. Season with salt and pepper if desired (this may depend on what seasoning was already on the salmon).
3. Using about 1/2 cup of salmon mixture, form into patties about 3 inches wide x 3/4 inch high. Set patties on a plate and refrigerate until ready to pan fry.
4. Heat skillet on med-high, add 1/4 cup oil and swirl to coat pan. When the oil is shimmering, carefully place salmon patties in hot oil about 1 inch apart (do not crowd pan – cook in batches if needed) and cook undisturbed about 4-5 minutes until deep brown crust forms.
5. Using a spatula/turner gently flip the patties and cook undisturbed on the other side for another 4-5 minutes.
6. Remove cooked patties from pan and place on a paper towel lined plate until ready to serve (keep warm if cooking another batch). Serve with Quick Remoulade Sauce on side.


If you are not familiar with Remoulade Sauce, it is a mayonnaise based sauce similar to the more well-known “tartar sauce” but with elevated ingredients and a distinct sharpness that goes really well with fish and seafood. Most recipes call for a crunchy element such as chopped celery, capers, or cornichons (pickles). For this “quick” version I just used what I had on hand – so I chose to minced up a dill pickle. A grainy mustard is best in this recipe, but any sharp flavor mustard will work such as creole, spicy brown or Dijon. Some people say adding horseradish is a must, but I didn’t use it for this recipe.


Dan’s Quick Remoulade

Prep time:  5 minutes
Makes:  about 1 cup

Ingredients:
1 cup Heavy Mayonnaise (such as Hellman’s)
2 TBSP finely chopped Dill Pickle
2 TBSP Ketchup
1 TBSP Grainy Style Mustard (or other sharp mustard)
1 TBSP Worcestershire Sauce
1 tsp Lemon Juice
1 dash Hot Pepper Sauce (like Tabasco)

Directions:
1. Combine all ingredients in a small bowl and refrigerate until ready to serve.


There you have it, Salmon Patties with Quick Remoulade sauce. A great way to use up leftover cooked Salmon. This recipe also makes a great appetizer if you form small patties (about the size of a silver dollar). I hope you enjoy this economical and delicious “old school” way to cook Salmon.

Until next time remember, “The Sauce Makes the Difference!” 

Dan’s BBQ Spareribs

Summer time is a great time to enjoy foods that are not only tasty but fun to eat. Ice cream, corn on the cob, hots dogs, potato salad, strawberry shortcake, and of course all the wonderful grilled foods we love — chicken, steaks, kabobs… and BBQ Spareribs!

BBQ Spareribs are one of those foods that I only make in the summer. Maybe because the local market brings the price down at that time, or maybe because it’s more fun to eat with your hands when your sitting at a picnic table. Whatever the reason, I definitely like some ribs during those dog days

With the plentiful BBQ restaurants around town, I do get to enjoy some Spareribs more often that just in the summer — but nothing compares to the Spareribs that come off my own backyard grill. I think my Spareribs are the best (of course I think everything I cook is the best).

If you’re going to make Spareribs at home you have to start with the right cut of pork. When I make Spareribs at home I like to start out with a full slab of spareribs. This means the whole bottom portion of ribs that has not been trimmed or cut into what’s known as “St. Louis style” ribs. I choose the whole slab for two reasons, first it’s the most economical (you can find packages of whole uncut ribs for a great price at many stores) and second I believe the flavor is better when you start with the whole slab because you get all the fat and bones which is where the flavor lives. Personally I also don’t bother with the more expensive “baby back” ribs — and although I do like what’s known as “country style” ribs, for barbecuing nothing beats the good ole Spareribs.

Here’s a quick rib pictorial I found on the internet:
1. Full slab spareribs (my preference)
2. St. Louis Style spareribs
3. Baby Back ribs
4. Country Style ribs

rib-pictorial

Okay, now that you get the picture (pun intended) the next important step in making great Spareribs is the seasoning or “rub.” You can try the different ones you find in the grocery stores or you can do a bunch of research online for the “prize winning” rubs — but what I find is most people have the ingredients for a great rib rub in their spice pantry and you can whip it up in no time at home.


Dan’s Basic Pork & Rib Rub

Ingredients:
2 TBSP Paprika (regular)
1 TBSP Salt
1 TBSP Black Pepper
1 TBSP Chili Powder
2 tsp Smoked Paprika
2 tsp Ground Cumin
2 tsp Onion Powder
1 tsp Garlic Powder
1/2 tsp Cayenne Pepper
1/4 cup Brown Sugar (optional)

Directions:
1. In a small mixing bowl whisk together all ingredients until fully combined. Rub into all sides of meat before cooking. I make my rub sugar free but if you like a sweet rub then add the brown sugar. Store extra rub in an air-tight container at room temperature for up to one month. Makes about 1/2 cup rub enough for one full slab; double or triple the recipe if making more ribs.


Now that you’ve picked out your ribs and made your “rub” you’re ready to get cooking. Here is my favorite way to prepare fall-off-the-bone tender Spareribs that will be the highlight of your next cookout. This method uses the oven to get that “low ‘n’ slow” tenderness that is usually found in smokehouse barbecue. Using the oven also makes it so you spend less time standing over the grill. 


Dan’s BBQ Spareribs

Prep time: 20 minutes
Cook time: 2 1/2 hours in oven, 30 minutes on grill
Serves: 4-6 

Ingredients:
1 full slab Pork Spareribs (about 6 pounds)

1 batch Rib Rub (about 1/2 cup)
1 cup Prepared BBQ Sauce + 1 cup Water
Parchment Paper
Aluminum Foil

Directions:
1. Preheat oven to 275 degrees F and set rack in center.
2. Remove ribs from packaging, rinse and pat dry with paper towels.
3. Turn ribs bone side up and remove the membrane covering the bones: Use a sharp knife to lift a corner of the membrane and then using a paper towel, grip the membrane and firmly and evenly pull it off. If it doesn’t come off in one sheet then do the process again with the rest.
4. On the counter lay out a double thickness of aluminum foil big enough to completely envelope the ribs – topped this with a double thickness of parchment paper.
5. Place the ribs meaty side up on foil/parchment and generously coat with rib rub. Turn over and coat the bone side.
6. Starting with the parchment paper, fold the paper over the ribs to completely seal them in. Then bring the foil up over the paper and completely seal the package by crimping the seams of foil.
7. On a rimmed baking sheet, lay the foil wrapped ribs seam side (bone side) down and bake in the preheated oven for 2 1/2 hours. (Ribs should be cooked to at least 185 degrees F internally.)
8. Remove pan from oven and carefully open the foil/paper packet (their may be a lot of juice so be careful). Allow the ribs to rest at least 30 minutes or refrigerate over night.
9. Heat an outdoor grill to medium-high.
10. Mix 1 cup of your favorite BBQ sauce with 1 cup water in a small bowl.
11. Cut the cooled (or refrigerated) ribs into 4 sections. Grill the ribs, turning frequently and 
using a brush baste the ribs  with sauce after each turn. Cook until ribs are glazed and nicely browned and heated through.
12. Serve the BBQ Ribs as is or with additional sauce.


So there you have it, my favorite summer time BBQ Spareribs. If you haven’t attempted spareribs at home — give this method a try and I’m sure you’ll be pleased with the results. Tender, meaty, and so delicious. Perfect for those Holiday cookouts, family picnics, graduation parties, or any other summer time get together. 

Until next time remember, “The Sauce Makes the Difference!”

Chicken Oregano with Potatoes

Once again life in my world has been busy and unfortunately one of the things that gets set aside is my blogging. So I’m finally publishing this post that I started writing last month… thanks for your patience and thanks for reading!


June is one of those months where the weather can be so unpredictable… oh wait, that’s pretty much every month in Rochester NY. But seriously, I had some bone-in chicken quarters that I wanted to barbecue and then it rained and rained and rained — so I had to change plans (because I only grill in fair weather).

While looking at the cut up chicken on my counter, it reminded me of the years that Lista’s Italian Cuisine was one of the few full service restaurants around Brockport that also did catering. My Dad did a lot of catered events when the restaurant was in business. Everything from weddings, graduations, and corporate events to small affairs in private homes. And not everything was strictly Italian food.

Dad was well known for his catering skills and was called on often to create memorable buffets filled with hors d’oeuvres, salads, antipasto trays, carved meats, and of course Lista’s famous pasta dishes. Dad’s roast turkey, ham and prime rib were outstanding… and his attention to detail when garnishing his trays was second to none.

Lista'sCateringJune1975

(This photo taken in June 1975 is from one of the catered events at Lista’s.)

One story I like to tell is how Dad would take potato or macaroni salad and mound it up on a serving tray then use heavy mayonnaise to “frost” the whole thing — then using mayo mixed with food coloring, he would fill a pastry bag and pipe on decorations just like a fancy wedding cake. It was pretty impressive!

Of course not everything was that labor intensive, in the years between 1960 and 1980 there was a very common buffet served at every party house and catering restaurant around town — I referred to it as the “Rochester Buffet” and it consisted of: Roast Beef au jus (sometimes hand-carved), Herb Roasted Chicken, Baked Ziti, Roasted Tiny Potatoes (sometimes called rissole potatoes), cooked Vegetables (usually green beans amandine or California blend), Tossed Salad, Dinner Rolls… and sometimes a big bowl of Fruited Jello!

Many wedding receptions during those years had that same buffet no matter where you went. Still I fondly remember how much I loved that herb roasted chicken (with garlic, lemon and oregano) and those tiny rissole potatoes (crisp outside and creamy on the inside) my Dad would make for those catered events.

So since it was raining and I wouldn’t grill outside, and I wanted to avoid turning on the oven and heating up the house… after all it was June! Instead I transformed the ingredients I had on hand into a delicious Chicken Oregano with Potatoes one pan meal that reminded me of those favorites from my past.


Chicken Oregano with Potatoes

Prep time: 20 minutes
Cook time: 40-60 minutes
Serves: 4-6

Ingredients:
3 lbs Chicken on the bone (Leg Quarters, Thighs or Whole cut-up)
1 1/2 lbs Red Potatoes (about 6 large) – roughly the same size, scrubbed
1/ 4 cup Olive Oil – divided
2 Fresh Lemons – one quartered, one sliced
8 cloves Fresh Garlic – roughly chopped
1/4 cup Fresh Oregano Leaves or 2 TBSP Dry Oregano
1/2 tsp Crushed Red Pepper
Salt and Pepper – to taste

Directions:
1. Trim chicken pieces of excess fat, rinse and pat dry with paper towels. If using leg quarters, separate at joint between drumstick and thigh. If using a whole chicken cut into 8-10 pieces (i.e. 2 wings, 2 drums, 2 thighs, 2 breast pieces – halved if large). Season both sides with salt and pepper.
2. Scrub red potatoes and remove any “eyes” or blemishes with a paring knife. Cut potatoes in half. Set aside.
3. Heat a very large (12″-14″) deep-sided skillet or dutch oven over med-high heat. Add 2 TBSP olive oil, swirl to coat pan, and the chicken pieces – skin side down. Cook undisturbed for 8-10 minutes until fat starts to render and a nice brown crust begins to form. Turn over and cook undisturbed for another 8-10 minutes. Remove chicken to a plate and pour off excess fat/oil from pan.
4. In the same pan 
over med-high heat, add the remaining olive oil, sprinkle in the crushed red pepper flakes, and chopped garlic. Cook until garlic is fragrant – about 5 minutes. Add chicken pieces back to the pan and arrange the potatoes, cut side down, around the chicken. Add the oregano and lemon slices (reserve quartered lemon) evenly over the chicken and potatoes. Allow to cook undisturbed for 10 minutes.
5. After 10 minutes, turn the potatoes and chicken pieces and redistribute so everything rests on the bottom of pan. Squeeze the lemon wedges over the chicken and potatoes. Season with a little more salt and pepper. Allow to cook for another 10-15 minutes until potatoes are tender and chicken is cooked through (165 degrees) and juices run clear.
6. Remove pan from heat and allow chicken and potatoes to rest 5 minutes. Gently lift portions of chicken and potatoes with a spatula (to preserve the brown crust) and serve with your favorite vegetable or green salad.


There you have it, my Chicken Oregano with Potatoes — a delicious meal that is simple to prepare and cook in one pan — that reminds me of my Dad’s catering days. Keeping with the “Rochester Buffet” theme, I served the chicken and potatoes with some California Blend vegetables (broccoli,  cauliflower and carrots) but it goes great with any fresh or frozen vegetable or a nice green salad. If you like the bright taste of fresh lemon, go ahead and squeeze a little over the chicken and potatoes just before serving. I hope you find a chance to make this dish… maybe on the next rainy day in Rochester.

Until next time remember, “The Sauce Makes the Difference!”

Quinoa Patties

Quinoa is one of those nutritionally dense super foods that you either love; hate, or have never tried. A few years ago, quinoa came onto the culinary scene in a big way and is now found everywhere and in everything from appetizers to desserts.

Quinoa (pronounced “Keen-wah” not “kin-no-wa” as my mom says) is a flowering plant with edible seeds originally found in the Andean region of South America. Although the seeds have been cultivated and grown as a grain crop for thousands of years it has only been grown in the USA since 1983.

As a crop, quinoa is not a true cereal grass like wheat, corn, rice and oats — but is a non-grass pseudo-cereal like buckwheat and amaranth and is gluten free. Nutritionally quinoa’s biggest claim to fame is that it is the only plant based food that provides all nine essential amino acids, making it a source of complete protein (perfect for vegetarian and vegan diets).

You can find quinoa in almost any grocery store in white, red or black varieties, as well as, packaged blends and mixes. There is even quinoa flour for gluten free baking.

For the novice, it is important to note that quinoa seeds have a natural pest deterrent coating that contains bitter tasting saponins. Most commercially processed quinoa have been treated to remove this coating but it can still taste bitter unless you thoroughly rinse the seeds before cooking. Another trick is to lightly toast the seeds in a dry skillet over medium heat until they just start to brown and get a nice toasty aroma — then cook in boiling water per package directions (my son swears by this method).

My own journey with quinoa started a few years back while attempting to find the right diet to combat my wife’s many food sensitivities. Because of her needs, our family stopped eating food containing gluten, yeast, dairy, sugars, and starchy foods like potatoes, corn, and rice. So it was suggested we try quinoa as a substitute for grains and potatoes. Before that time I had never eaten quinoa and really only heard of it as a “health food.”

Since then, I have made quinoa a regular part of our weekly menu and have used it in dozens of recipes. Quinoa can be a great gluten free replacement for breadcrumbs in meatloaf or meatballs — or a stand-in for rice in casseroles and stuffed peppers. Cooked in water or broth quinoa makes a delicious side for entrees and can be served under ragouts or braised items instead of rice or couscous. I’ve even used quinoa instead of bulgar to make a passable tabbouleh salad.

However, my favorite way to enjoy quinoa is to make these wonderful pan-fried patties as a side dish. Similar to a latke (potato pancake) or fritter, these quinoa patties are crispy on the outside and tender and savory on the inside. They are a perfect addition to grilled meats or broiled fish or can stand alone as a light meal alongside a green salad.


Dan’s Quinoa Patties

Prep time: 30 minutes
Cook time: 20 minutes
Serves: makes 10-12 patties

Ingredients:
3 cups Cooked Quinoa – cooled to room temp
1 (10 oz) pkg Frozen Chopped Spinach – thawed & squeezed out
1/2 cup Finely Chopped Sweet Onion (like Vidalia)
3 Whole Eggs – beaten
1/4 cup Grated Parmesan Cheese
2 TBS Flour (regular or gluten free)
1 tsp Italian Herb Seasoning
1/2 tsp Salt
1/4 tsp Garlic Powder
1/4 tsp Black Pepper
Olive Oil as needed for pan frying

Directions:
1. Cook 1 cup quinoa in 2 cups water or broth per package directions (about 15 minutes). Pour cooked quinoa onto a large plate, spread out and let cool to room temperature.
2. Thaw frozen chopped spinach (use the microwave) and place in a strainer and squeeze as much water out as possible.
3. 
In a large mixing bowl combine the Italian seasoning, salt, garlic, pepper and flour – whisk together. Add cooled quinoa, spinach, chopped onion, eggs, and Parmesan cheese to the bowl and combine thoroughly. Using about 3/4 cup of quinoa mixture hand-form 10-12 small patties 3″ round x 1/2″ thick.
4. Heat a large skillet over medium heat, add 2 TBS olive oil to hot pan and swirl to coat, lay patties in the pan about 1/2″ apart (cook in batches if needed). Cook patties undisturbed for about 6-8 minutes. Turn over and press down slightly with a spatula. Allow to cook undisturbed for another 5-6 minutes until patties are deep brown, crisp outside, and firm in the middle. Remove from pan and place on parchment lined plate and keep warm until all patties are done and ready to serve.
5. Serve the patties alone or as a side dish (they are really good topped with a little Greek yogurt or sour cream mixed with some sriracha sauce).


There you have it, my recipe for Quinoa Patties. A great protein packed, nutrient dense, and delicious addition to your next meal. I have used grated zucchini, or finely chopped broccoli instead of the spinach… and even grated carrot or sweet potato for a brighter taste. I hope you enjoy this recipe and if you haven’t tried quinoa yet — give it a chance and I think you’ll learn to really enjoy this versatile “super food.”

dadcirca1972

Happy Father’s Day to any of my readers that are dads. I’m forever grateful for my dad, Vinnie Lista, who was a strong influence in my life especially teaching me to appreciate great food and giving me the experience and skills to create and cook the great recipes I feature on this blog.  Thanks Dad… you are always in my heart.


Until next time remember, “The Sauce Makes the Difference!”

Spiedies

Spiedo (no not the skimpy swimsuit) the Italian word meaning “spit” (like cooking over a fire) is the root of the name spiedies — a marinated and grilled meat dish created in the Binghamton NY area. This dish is so popular that thousands of visitors have flocked to Binghamton for the annual Spiedie Fest & Balloon Rally for more than 30 years.

Based on the Italian dish spiedini or spidducci (in Abruzzo) which is made with cubes or balls of goat or sheep meat flame grilled on skewers. Spiedies came to Central New York through Italian immigrants who created the local dish in the 1920’s. Growing increasingly popular between the 1950’s and 80’s this grilled meat on a stick has become a regional favorite. Originally made with marinated lamb or beef, today’s spiedies are predominantly chicken or pork — while some home chefs like to use venison. Whatever meat is used, the real secret to a great spiedie is the marinade — a closely guarded secret for some of the Binghamton area’s more prominent spiedie producers. 

A combination of oil, vinegar, lemon, salt, spices, and herbs are used to marinate the meat from 1 to 3 days before skewering and grilling over charcoal. Although the formulation varies, a true spiedie marinade will feature basil, oregano and mint. Like many regional foods there are the originals, the close to authentic, and the poor knock-offs. When it comes to spiedies any recipe made with bottled Italian salad dressing is not the real deal… so stay away.

Marinating the spiedies is easy using a zip-top freezer bag — put the meat cubes and marinade in the bag; smoosh it around a little bit to make sure it’s all coated, press out the extra air and seal. Then refrigerate overnight and until ready to grill. You should wait until you’re ready to grill before putting the marinated meat on skewer. Of course if you want to take the spiedies to a picnic and grill them there, make up the skewers and wrap them in plastic wrap, keep them on ice until you arrive at your destination then get grilling.

My personal favorite recipe is below and I prefer pork spiedies (just because I do) but chicken, beef, lamb or venison all work equally as well. Traditionalists will serve the spiedies on a thick slice of soft Italian bread (using the bread to pull the meat off the skewer). A good Italian sub roll works great or even a hot dog bun in a pinch. Of course you can eat the spiedie right off the spit or serve it over some rice or noodles if you want.

However you make it give spiedies a try at your next cook-out… you’ll be glad you did!


Dan’s Pork Spiedies

Prep time: 15 minutes + 1-3 days marinating time
Cook time: 20 minutes grill time
Serves: about 6 skewers

Ingredients:
2 lbs. Lean Pork Shoulder or Loin – trimmed of excess fat
1 cup Olive Oil
1/4 cup White Vinegar (cider or red wine can be used)
1/4 cup Lemon Juice (bottled is fine)
2 cloves Fresh Garlic – pressed or finely minced
1 TBSP Dry Basil
1 TBSP Dry Mint
1 tsp Dry Oregano
1/2 tsp Salt
1/2 tsp Fresh Ground Black Pepper
6 Bamboo Skewers – soaked in water for 30 minutes
6 thick slices Italian Bread or Mini Sub Rolls (optional)

Directions:
1. Trim and cut pork into 1 inch cubes and place in a gallon size zip-top bag.
2. In a small mixing bowl, whisk together olive oil, vinegar, lemon juice, minced garlic, basil, mint, oregano, salt and pepper — set 1/2 cup marinade aside and keep in refrigerator until ready to use.
3. Pour remaining marinade over the pork in bag and seal. Massage the bag to ensure all the meat cubes are coated with marinade. Loosen one side of seal and squeeze out the excess air, reseal and refrigerate overnight or longer. Turn bag every so often if possible.
4. Preheat grill to med-high (charcoal should be ashed over — gas grill should be at 400 degrees).
5. When ready to cook, thread marinated pork cubes onto soaked bamboo skewers (about 6-8 pieces per skewer) until all pork cubes are used. Place spiedies on the hot grill and cook until all sides are slightly charred and meat is thoroughly cooked (reaches a temp of at least 165 degrees) about 20 minutes total.
6. To serve, place one grilled spiedie on a slice of bread and while gripping the meat, pull the skewer out leaving the meat cubes in the bread. Drizzle with some of the reserved marinade if desired.


There you have it my take on the Central New York favorite, Spiedies. Allowing the meat to marinate for at least 24 hours brings the true essence of the original spiedie to the dish. Grilling over charcoal is best but a propane grill is just fine — oven roasting can’t get the same flavor so don’t bother. Serve your spiedies on some good Italian bread as a sandwich or over rice. Drizzle some fresh marinade over the meat when serving, or add some grilled hot peppers or a dash of hot sauce if you want to spice it up. Give this regional favorite a try and I think you’ll make them again and again.

Until next time remember, “The Sauce Makes the Difference!”

Remembering Falafel

Enjoying lunch with a good friend this week at one of the many local diners, I ordered a Greek salad consisting of: lettuce, tomato, cucumber, onion, pepper, kalamata olives, feta cheese and grilled marinated chicken breast. It was a good salad and one of my usual lunch choices — but that salad got me thinking about another favorite food from the Mediterranean: Falafel!

dansfalafel

So, taking a departure from my usual reminiscing about Lista’s Italian Cuisine, my family’s Italian-American restaurant — today I wanted to feature this culinary staple from that Middle East/Mediterranean region.

Falafel is not just a popular New York street food, it is one of the most popular foods in the Middle East and a national dish of Israel. I first encountered falafel (and Middle Eastern foods in general) on a trip I took to Israel in 1990. About the second day of my week long tour of the Holy Land, my group stopped in a street market for lunch and I had my first falafel from a cart vendor. I remember the man using a common box cutter to slice the top quarter from a pita pocket and stuff in three walnut sized falafel, followed by “salad” consisting of chopped cucumber, tomato, green pepper, and onion — then a squeeze of tahini (sesame seed paste) sauce, and as requested a squeeze of “charif” (hot sauce)… and finally a handful of french fries stuffed on top. After eating the fries, I got down to business and took my first bite of the falafel and I was instantly hooked on this amazingly delicious regional food. 

Most recipes for falafel are made with chickpeas (garbanzo beans) with spices and herbs, however, my favorite local Mediterranean restaurant makes their falafel using chickpeas and fava beans. I wondered about this combination and after doing some research found that due to Favism (a genetic enzyme deficiency found in some people of the Middle East and North Africa) the use of fava beans caused sickness and was mostly discontinued and replaced with the chickpea. This local restaurant also adds sesame seeds to their falafel which I really like for the added texture.

Unlike many other sandwiches or hand-held foods, falafel is one that isn’t generally tried at home. Admittedly, I hadn’t made my own falafel before coming up with the recipe featured here. Most authentic recipes call for dry chick peas that are soaked overnight and then mashed or ground… this seemed too much work to me since there were cans of chick peas in my pantry. Also, falafel is typically deep-fried — and as I’ve mentioned a few other times, I prefer not to deep-fry in my home (it’s messy). So I did a lot of reading and set out to make my home-made falafel with the convenience of canned beans and pan frying. Needless to say I had a few failures before I found the right ingredients and method to make a falafel that taste great and can be made the day I crave it.

That is not to say that making falafel isn’t time and labor intensive, because it can be. But these are a few tricks that I found to help me get really good results. First, I opened two cans of chick peas and drained them in a strainer, then placed them on a paper towel lined platter and allowed them to air-dry for a couple hours (I found this step helps with the texture of the finished product). Next, I got all my other ingredients out and put them close at hand (as the French say, “mis en place” — everything in its place). Finally, when I cooked the falafel I used a six inch frying pan with about 1/2 inch of oil to shallow fry them in batches. I chose to use canola oil for frying and I used a one ounce cookie scoop to portion the falafel — which I flattened slightly into disks that were roughly 1 1/2 inches across and 3/4 inch high.

[Please note that this recipe is not vegan since the recipe includes an egg to help keep the falafel together — the recipe also calls for some flour but I used King Arthur Gluten Free All Purpose flour with great results.]

I served the falafel with lettuce, tomato, cucumber and onion — and topped them with tahini sauce and charif sauce (see below). The results were delicious and we ate every last one.


Dan’s Falafel

Prep time: 30 minutes + 1-2 hours air-drying chick peas
Cook time: 30-40 minutes
Makes: 16-20 depending on size

Ingredients:
1 1/2 cans Chick Peas (about 2 cups) – drained & air-dried
1 cup Loosely Packed Fresh Parsley (stems removed)
1/2 cup Yellow Onion – roughly chopped
2-3 cloves Fresh Garlic – roughly chopped
2 TBSP Sesame Seeds (optional)
2 TBSP All Purpose Flour (regular or Gluten Free)
1 Whole Egg
1 tsp Ground Cumin
1 tsp Ground Coriander
1/2 tsp Baking Soda
1/4 tsp Cayenne Pepper
1/4 tsp Salt (or to taste)
Oil for Frying – as needed

Directions:
1. Drain the chick peas and spread about 2 cups on a paper towel lined platter/tray and allow to air-dry for 1-2 hours.
2. Meanwhile chop onion, garlic and parsley and add to the bowl of a food processor – pulse until finely chopped (scraping bowl as needed). Empty into a mixing bowl.
3. Add sesame seeds, flour, egg, cumin, coriander, baking soda, cayenne and salt to parsley/onion mixture and combine thoroughly. Set aside.
4. Add 1/2 the chick peas to food processor and pulse until finely ground but not a paste. Add to mixing bowl. Pulse remaining chick peas until coarsely ground (for texture) and add to mixing bowl. Mix ingredients together until everything becomes cohesive (sticks together). Place in refrigerator until ready to pan fry.
5. In a small (6 inch) frying pan, heat about 1/2 inch of oil (I used Canola) over med-high heat until shimmering.
NOTE: at this point you need to test the mixture by frying one falafel first — if it starts to fall apart in oil then add 1-2 more TBSP flour to mixture and try again.
6. Using approx. 2 TBSP falafel mixture, form 16 to 20 walnut sized balls. Gently place 4-5 balls into hot oil and flatten slightly with a fork into disks about 1 1/2 inches round by 3/4 inch thick. Allow to fry undisturbed for 5 minutes and turn over and fry for another 3 minutes.  Falafel should be dark brown and crispy outside. Continue frying falafel in batches and drain on paper towel lined plate.
7. Serve falafel in warm pita pockets with lettuce, tomato, cucumber and onion. Drizzled with tahini sauce and/or charif (hot) sauce. Enjoy!


To make Tahini Sauce:  In a small bowl whisk together 1/2 cup tahini (sesame seed paste) with 1/4 cup water, 2 tbsp lemon juice, 2 tbsp olive oil, and a pinch of salt. 

To make Charif (hot) Sauce:  In a blender combine a can of diced tomatoes (drained), 1/4 cup vinegar, 1/4 cup olive oil, 3 cloves garlic, 1 tsp cumin, 1 tsp salt, and 1 or 2 tsp cayenne pepper. Blend until smooth.


There you have it, my version of Falafel that I think taste wonderful and are fairly quick and easy to prepare. These are good stuffed into a pita for the traditional street food experience, or on top of a simple Mediterranean style salad, or as an appetizer served with dipping sauce (tahini sauce, charif sauce, tzatziki (yogurt sauce) or even ranch dressing). With a little patience and practice I think you’ll find great results from these recipes.

Until next time remember, “The Sauce Makes the Difference!”

Classic Pasta Salad

Memorial Day weekend is the start the grilling season for me. I’ll admit, like most people around here, I enjoy grilling or barbecuing (low and slow) in my own back yard — but I’m definitely a fair-weather cook… no inclement weather or winter grilling for me! I just don’t get the appeal of standing in an open garage wrapped in a parka grilling burgers in January.

So this weekend (80 degrees and sunny) I got out there and cleaned up the ol’ gas grill; checked the remaining propane in the tank (praying I didn’t have to drive to the corner and get a refill), and fired her up to cook some burgers and hots for the Lista family. Well actually it was burgers, red hots, white hots, Italian sausage, spinach and feta sausage, and andouille sausage — we like variety. 

Along with all the charcuterie we also enjoyed several salads including that proverbial Lista favorite Pasta Salad. In my family, pasta salad is a staple at most gatherings. With its colorful fresh veggies, diced cheese and deli meats, pasta salad is the flamboyant cousin of the macaroni salad family — and a refreshing change of pace from the heavier mayo-based variety. I first remember making pasta salad at Lista’s Italian Cuisine as a feature for our “fabulous salad bar” and as a side dish for many lunch specials. We referred to it as Italian Pasta Salad (of course) and it was dressed with a simple vinaigrette and featured fresh broccoli florets, tomatoes, olives, salami and cheese.

It seems like pasta salad really came into vogue in the early 1980’s. I remember it becoming more and more popular around that time, and was served at restaurants featuring large elaborate salad bars (remember Charlie Bubbles?) and grocery store that  began carrying prepared foods to go. It was around that same time that many of  our local taverns began to serve food to their customers (definitely a nice break from pickle eggs and beer nuts). And when a bartender served a burger or beef on weck they could “fancy it up” by adding a side of pasta salad since the traditional oil and vinegar dressing held up better than a mayo-based dressing and thus kept customers experiencing undue intestinal discomforts.

There are so many different renditions of pasta salad that if you don’t have a particular favorite you can make it different every time. I tend to be a traditionalist and like the classics, so here is my favorite versions of Pasta Salad based on the one we served at Lista’s and I have made many times since.


Classic Lista’s Pasta Salad

Prep time:  30 minutes
Cook time:  15 minutes (plus up to 8 hours chilling)
Serves:  8-12 

Ingredients:
16 oz Fusilli Pasta (spirals) preferrably Tri-Colored – cooked al dente
1 small head Broccoli – cut into tiny florets
1 lb Roma Tomatoes – diced (or cherry tomatoes halved)
1 small Zucchini – trimmed and halved lengthwise, cut into thin slices
1/2 small Red Onion – thinly sliced
1 cup Ripe (black) Olives – halved lengthwise
8 oz Fresh Mozzarella – cut into 1/2″ cubes
4 oz Genoa Salami – cut into 1/2″ cubes (or julienne strips)
1/2 cup Grated Pecorino Romano Cheese – divided
1/2 cup Extra Virgin Olive Oil
1/4 cup Red wine Vinegar
1 TBSP Dijon Mustard
1 TBSP Sugar
1 tsp Dry Italian Herb Blend
1/2 tsp Kosher Salt
1/2 tsp Freshly Ground Black Pepper
Pinch Red Pepper Flakes
Chopped Fresh Parsley – for garnish (optional)

Directions:
1. In a large pot of slated water, cook the pasta per package directions until just al dente (about 8-10 minutes). Drain in a colander and rinse under cool water. Shake off excess water and allow to sit in colander until ready to use.
2. In a small bowl combine 1/4 cup Romano cheese, olive oil, vinegar, dijon mustard, sugar, Italian herbs, salt, black and red peppers. Whisk together with a few drops of water to form a vinaigrette. Cover and refrigerate until ready to use.
3. In a large mixing bowl, combine the broccoli florets, diced tomatoes, sliced zucchini, sliced onions, halved olives, diced mozzarella and salami. Add cooked and cooled pasta and vinaigrette to bowl and toss until all ingredients are combined. Cover and chill for at least 2 hours up to over night.

4. Pour salad into serving bowl and sprinkle remaining 1/4 cup Romano cheese and chopped fresh parsley (if using) over the top as a garnish before serving.


There you have it, a Classic Pasta Salad that will work for any pot-luck, picnic or family gathering. Remember to give it plenty of time to chill before serving and keep it colorful and fresh. I hope you enjoy this version of a simple family favorite.

Until next time remember, “The Sauce Makes the Difference!”

Mother’s Day

Today is Mother’s Day (of course in my family every day is Mother’s day) so I wanted to give honor to my beautiful mom Doris Lista.

Mom has been a great influence in my life and over the years we have forged a wonderfully candid and dependable relationship. Many of the better qualities I possess can be attributed to mom’s steady character, persistent teaching, and unwavering love. Through many difficult moments, mom taught me perseverance, dignity, hope and faith that in the end everything will work out. And most importantly, mom taught me to value myself as a person despite what others might think, say or do.

In my perspective, mom’s association with 74 Main Street and Lista’s Italian Cuisine was much more behind the scenes than hands-on. Mom’s greatest role in those days was as an anchor for our family and supporter of my dad. Although she did occasionally work at Lista’s, I always think of mom as a school teacher and administrator, and a tax preparer (operating Lista’s Tax Service until  she retired at age 72) — and as the love of my dad’s life for 56 years of marriage.

Although mom wasn’t the biggest culinary influence in my life, she did have her moments in the kitchen. I still can’t match my mom’s pot roast or beef stew — mine just never quite tastes as good. And some of her favorite Gailor family recipes were only made by a feel and memory that can’t be passed down. Of course there were the not-so-successful dishes like the one called “Shipwreck” (which I think came from my sister’s high school Home Economics class)… and the name says it all as far as I was concerned. Still, unlike me, one thing mom excels in is baking delicious and sometimes decadent desserts. Mom’s holiday traditional Cream Cheese Fruit Pies were legendary (at least in our family) and her Pineapple Upside down CakeCinnamon Streusel Cake, and Chocolate Almond Crunch Cake are melt-in-your-mouth amazing! To this day I request mom’s Sour Cream Chocolate Cake for my birthday every year — I don’t often get it but I still ask.

Funny thing is I remember mom’s favorite dessert, back in the day, was Coconut Cream Pie, she loved Coconut Cream Pie but I can’t recall her ever making it at home. (At Lista’s we  had a wonderful baker, Marie Cowan, who was renowned for her pies.) When I was in grade school and mom was still teaching, we used to walk to Lista’s after school to see my Dad and get a snack. I liked french fries… but mom would always order a slice of Coconut Cream Pie and… a Diet Pepsi! The incongruity of that combination still makes me laugh.

coconutcreampie

So in honor of Mother’s Day and my mom Doris, I offer you this Coconut Cream Pie recipe. This recipe is NOT a coconut custard pie made with eggs and a cooked filling — instead it is a “quick” type recipe using vanilla pudding mix — it’s not the original from Lista’s (those weren’t passed down to me) but it’s probably pretty close from what I remember.


Pretty Close Coconut Cream Pie

Prep time: 15 minutes
Total time: 4 hours including chilling
Serves: 8-12 

Ingredients:
1 (9 inch) Prebaked Pie Crust (homemade or store bought)
2 (3.4 oz) boxes Instant Vanilla Pudding & Pie Filling Mix
3 1/2 cups Cold Milk
2 cups Sweetened Shredded Coconut
1-2 cups Fresh Whipped Cream – for topping
1/2 cup Toasted Coconut – for topping

Directions:
1. Prepare and bake one 9 inch pie crust until golden brown. Chill pie crust while making the filling.
2. Add pudding mix to a large bowl, add cold milk and whisk until smooth. Let sit for 5 minutes until soft set, then stir in 2 cups coconut. Pour into prepared pie crust. Cover with plastic wrap and chill for at least 3-4 hours.
3. To make whipped cream use:
– 1 cup cold heavy whipping cream
– 1 tsp vanilla extract
– 2 tbsp powdered sugar
Directions: Using chilled bowl and beaters, beat the heavy cream until it thickens. Add vanilla and powdered sugar (a little at a time) and continue to beat on high until stiff peaks form – about 8-10 minutes depending on mixer speed. Chill until ready to use.
4. To make toasted coconut use:
– 1/2 cup shredded sweetened coconut
Directions: Place a small frying pan over medium-low heat. Add the coconut and break up any chunks using a wooden spoon. Cook, stirring almost constantly, until the coconut begins to steam and brown. Turn the heat to low and continue stirring constantly until the coconut is evenly browned  — be careful it will go from brown to burned quickly. As soon as the coconut is browned remove pan from heat and place the toasted coconut on a plate to cool.
5. Before serving, top the pie with whipped cream and toasted coconut. Store covered in refrigerator for up to 3 days. 


There you have it, Coconut Cream Pie that’s pretty close to the one my mom loved to eat at Lista’s. If you were around Brockport NY back in the day and remember eating at Lista’s Italian Cuisine, I hope this post reminds you of the great desserts we served. And if you ever knew my mom, Doris Lista, as a neighbor, teacher, or income tax preparer, or friend I hope you can celebrate her with me on this Mother’s Day. Love you Mom!

Until next time remember, “The Sauce Makes the Difference!”

Fajitas for Cinco de Mayo

We really like Mexican food… or probably more accurately Mexican-American or Tex-Mex food. There is a local place that we like to eat occasionally (no, not Taco Bell, although we do eat there too) and we almost always end up getting fajitas. Fajitas are a good choice since they can be enjoyed without the tortillas which make the dish basically Gluten Free (thus making it suitable for Andrea to eat). 

The funny thing about fajitas is that, technically speaking, they are made with grilled skirt steak (arracheras in Mexico) — yet we typically order our fajitas made with chicken or sometimes shrimp… and on more than one occasion we have eaten them sans any protein (i.e. vegetarian). So, although I like fajitas, I’m probably not a true fajita expert. That being said, I did discover that fajitas have only been on the food scene for the past 45 years or so — kind of nuevo cuisine in a sense.

Fajitas most likely came from a common practice during the 1800’s cattle drives down Texas way when the cowboys would butcher a steer for their dinner and offer the less desirable portions to the Mexican vaqueros who helped drive the cattle. The arrachera (or skirt steak) is a tough cut that comes from the belly of the cow and would otherwise be cast aside. The vaqueros would cook this meat seasoned with salt and chilies over the camp fire. To combat the stringy toughness of the meat they would cut it in thin strips before eating it with the usual tortillas and frijoles

Use of the word fajitas (meaning “little strips or belts”) did not come into print — or popularity — until the 1970’s, and as a menu item it didn’t grow in popularity until the 1980’s when most every part of the country was serving them. I can remember ordering fajitas for the first time back in the early 80’s and being rather astonished, and slightly embarrassed, to have the dish come out on a noisily “sizzling” platter with a kind of mini parade of servers carrying the accompanying side dishes of rice, refried beans, tortillas, lettuce, tomatoes, guacamole, pico de gallo, and sour cream! Really it was quite a production, and there was hardly room enough on the table for all the dishes.

So, since today is May 5th or Cinco de Mayo — one of my favorite foodie holidays (did I mention that I love Mexican food?) — and in honor of the commemoration of the Mexican Army’s difficult victory over the French Empire at the Battle of Puebla, on May 5, 1862, under the leadership of General Ignacio Zaragoza — I offer you my recipe for Fajitas.


Fajitas for Cinco de Mayo

Prep time: 30 minutes
Cook time: 30 minutes
Serves: 

Ingredients:
1/2 cup Packed Cilantro Leaves
1/4 cup Lime Juice
1 TBSP Chili Powder
1 TBSP Ground Cumin
1 tsp Garlic Powder
1/2 tsp Salt
2 lbs Skirt Steak (or similar cut)
2 Red Bell Peppers – seeded and sliced
2 Green Bell Peppers – seeded and sliced
1 large White Onion – halved and sliced
1 medium Poblano Pepper – seeded and sliced (optional)
Salt and Pepper to taste
Warmed Flour Tortillas for serving
Sliced Hass Avocados for serving
Pico de Gallo for serving (see recipe below)

Directions:
1. For Marinade: In a blender or food processor combine the cilantro, lime juice, chili powder, cumin, garlic powder and salt. Process until smooth adding a little water if needed.
2. Pour marinade in a resealable plastic bag, add the steak and turn to coat. Refrigerate until ready to use (about 30 minutes).
3. Make pico de gallo following the recipe below and refrigerate until needed.
4. Preheat a large grill pan or cast iron skillet over med-high heat. Working in batches if necessary, grill sliced peppers and onions until slightly charred and just crisp-tender. Place cooked vegetables on a platter and cover with foil to keep warm.
5. Remove steak from marinade and shake off excess. Using the same grill pan on med-high heat, grill the steak to desired doneness (about 3-5 minutes per side for medium rare). Remove steak to platter and allow to rest before slicing across the grain into thin strips.
6. To serve, place peppers and onions on tortilla, layer with steak strips, avocado, and pico de gallo. (Additional toppings may include lettuce, cheese, sour cream, etc.)


Quick Pico de Gallo

Ingredients:
2 medium Firm, Ripe Tomatoes – seeded & finely diced
1/3 cup Cilantro – chopped
1/4 cup White Onion – finely diced
1 small fresh Jalapeño – seeded & finely diced
2 TBSP Lime Juice – or to taste
1/2 tsp Salt – or to taste

Directions: Mix all ingredients in a small bowl and allow to marinate 30 minutes.


There you have it, my take on the traditional skirt steak fajitas. The marinade works equally as well on chicken, shrimp, or pork loin. Just adjust cooking times accordingly and use a thermometer to be sure the meat is cooked properly. I only featured a few toppings in this recipe since I wanted the meat to be the star — but feel free to use whatever your family likes. Although I think the pico de gallo is a must have. I also like to serve fajitas with yellow rice and pinto beans on the side. I hope you enjoyed Cinco de Mayo today and I hope you think to make fajitas again during the summer grilling season.

Until next time remember, “The Sauce Makes the Difference!”

Pasta Primavera

It appears Spring may have  finally arrived in Brockport NY (although there is something curiously akin to snow falling outside my window this morning). Often the seasons or events throughout the year conjure up my special food memories or ideas — and Spring always makes me think of Pasta Primavera.

pastaprimavera

In my early foodservice career, around 1984, I joined a local company that provided contract food services for business, industry, and school feeding programs. And basically for 15 years I managed cafeterias for some of Rochester’s largest employers and a couple of smaller school districts. In that arena I was often called upon to create themed menus and promotional events around the holidays and calendar seasons. Back then it was common to focus on a theme for the weeks leading up to and following the actual special day (much like retail stores featuring Christmas supplies in October). With Spring we would tend to focus on more fresh food, vegetables, lighter meals, and ‘take away’ items as more of customers were getting outside during their lunch breaks. With that in mind I would often feature lighter, more vegetable based meals like Pasta Primavera.

Pasta Primavera (meaning “first spring” in Latin) is a dish that combines early Spring vegetables (often green vegetables)  with pasta and traditionally a cream and butter based sauce (think Alfredo style) but just as often it will be prepared with an olive oil and garlic based sauce such as a basil pesto. It seems that Pasta Primavera came into being in the mid-70’s when a New York city chef and restaurateur prepared the dish for the first time for an Italian aristocrat summering in Nova Scotia. The dish then made its way back to NYC and the famous Le Cirque restaurant where it was hailed in a NY Times article as, “the most talked about dish in Manhattan.” From there Pasta Primavera grew in popularity all over the country and is still enjoyed in its various reincarnations today.

Pasta Primavera was all the rage in the 80’s when I started cooking professionally and so I made it often (although admittedly in many cafeteria setting it was typically a combination of ziti pasta, Alfredo sauce, and frozen vegetable blends). Still when the occasion arose for me to prepare a fresh version I would choose to make the recipe featured here using early Spring vegetables and the lighter olive oil based sauce. As you know, I only use Gluten Free pasta in my house — and I chose to write this as a vegetarian recipe — you could leave out the cheese and keep it vegan if desired. I hope you try this version and enjoy the tastes of Spring.


Dan’s Pasta Primavera 

Prep time: 15 minutes
Cook time: 20 minutes
Serves: 4

Ingredients:
1/2 cup Extra Virgin Olive Oil
2 cloves Garlic – peeled
1 cup packed Fresh Basil Leaves
1/2 cup Freshly Shredded Parmesan Cheese
8 oz Fusilli 
(spiral) Pasta – regular or Gluten Free
2 TBSP Olive Oil
1/2 cup Sweet Onion (like Vidalia) – diced
1 bunch Fresh Asparagus – trimmed of woody ends
1 5-6 oz bag Fresh Baby Spinach
1 cup fresh or frozen (thawed) Green Peas
1 cup Reserved Pasta Cooking Water (or vegetable broth)
Salt and Freshly Ground Pepper – to taste
More Freshly Shredded Parmesan Cheese – for topping

Directions:
1. Put the extra virgin olive oil and garlic in a food processor or blender, and process until garlic is finely chopped, add the basil leaves and Parmesan – pulsing until thoroughly combined and smooth. Season with salt and pepper to taste. Set aside.
2. Cut off the tips of the asparagus and cut the remaining stalks into 1/2 inch pieces — set both aside.
3. Meanwhile, in a pot of salted boiling water, cook the pasta to al dente (about 8 minutes). Remove 1 cup cooking water and set aside. Drain pasta over sink into large colander, briefly rinse with hot tap water, shake off excess and return to pot to keep warm.
4. Heat 2 TBSP olive oil in a large skillet over med-high heat, add the diced onion and cut asparagus stalks — cook for about 3 minutes.
5. Add asparagus tips and peas — cook for another 3 minutes.
6. Add spinach and basil/oil sauce — cook until spinach begins to wilt, about 2 more minutes (add 1/2 cup of reserved pasta cooking water or broth if needed). Turn off heat.
7. Add the cooked pasta and gently toss to coat adding remaining pasta cooking water/broth as needed to keep dish moist.
8. 
Remove from stove, season with salt and pepper to taste, cover and allow to sit for about 5 minutes as pasta absorbs the flavors.
9. Serve immediately topped with additional shredded Parmesan if desired.


There you have it, my version of the famous Pasta Primavera. You can easily substitute other green vegetables such as zucchini, broccoli, or beans — and you can add other vegetables like mushrooms, sweet red peppers, or tomatoes if your prefer that taste. I like the simplicity of fewer vegetables and I think sticking to green vegetables lends itself to the spirit of Spring time. However you decide to make your version, I hope you give it a try soon as Spring is certainly a short-lived season around here.

Until next time remember, “The Sauce Makes the Difference!”